
Ho , hum... I'm just sitting here at the computer, minding my own business...reading blogs and my emails....
Being a good girl and not succumbing to my urges to make more mug rugs incessantly through the day and night....
And then I read my sister's post on her Amy Made That! blog.
It's all downhill from here, folks. Now I have to add another sewing addiction to my list.... Cathedral Window Pincushions. :( (but inside I am feeling totally :) )
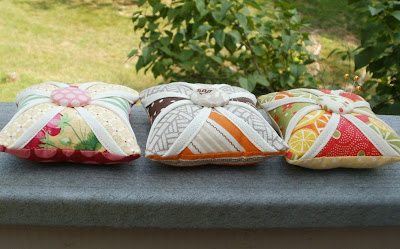 |
| Amy Made That! 's 3 little |
 |
| Amy Made That! 's |
- Cathedral Window Pincushion at Moda Bake Shop.com, by Kim of My Go-Go Life blogspot.com. I used this tutorial mainly.
- Cathedral Window Pincushion Tutorial by Susanne Klemm on Riley Blake Designs/Cutting Corners College.com I didn't actually use this technique this time, of folding the white block twice .... but it helped me understand the way to make the windows. I will try this method (of turning it inside out after you fold and sew the center) next time I make a pincushion. (See ,my addiction is flaring up again-- I left something for me to try the NEXT time I sew this pincushion... planning with anticipation for the next one, before I finish the current project !)
After reading these tutorials, I gathered my materials and was ready to go. I found some cute strawberry fabric, and some reds and greens to coordinate with it.
This is a picture of my first Cathedral Window Pincushion. I made some mistakes ,but I learned from them.
 |
| My first Cathedral Window pincushion ... It has some "issues" |
- I learned that the fabric that "peeks through" the windows has to cover the whole white square, so that it reaches out to the far corners. (I had to add some fabric patches to make the berry fabric reach to the corners.)
- I learned that the white fabric has to be folded over AT LEAST an inch (like a hem) or the whole square double -folded so that only hemmed fabric shows -with the curved parts (Deep , wide hems allow you to make the curve smooth and uniform in shape with the other curves.)
- I learned that stuffing with scraps of Pellon FF987 is not soft enough for filling a pincushion. I need to use fiberfill, and I need to fill it until it is plump!
Luckily, when I need expert advice, I can just call or email my sewing expert, Amy! She gives me lots of good tips and an endless source of projects to try!
Yesterday, I made my second pincushion. I took my time and re-read the instructions. Luckily, they made more sense this time. I made sure that I folded the white fabric exactly, making wide hems, and actually made the pincushion a little smaller. I liked Amy's smaller size . I used scraps of my Moda Dogwood Trail for the fabric. I love the pink and greens in this line.
 |
| My second pincushion! This has much more pizzazz! |
 |
| I made sure it was plump! |
 |
| Even Whiskers made sure that it was plump enough! |
I was finally pleased with my first little Cathedral Windows project.
You can bet it won't be my last!
 |
| I'm off to my sewing room! |
I knew you would love making these, the second time around. That pink dogwood one is sooooo awesome!
ReplyDeleteI love these!!! If only I didn't like to keep my pins in a tin that I can put the lid on (before I chuck it in a drawer) I'd be tempted! xx
ReplyDeleteThese are so great! You can really see the difference in your first one and the second one. I might need to make one for my mom for Christmas... Thank you for sharing the tutorials you found! I will most likely add it to my list on my blog if you don't mind :D
ReplyDeleteI think they both look impressive but I particularly like the colours of the second. Mmmmm i wonder what flavour will be in your next tart!
ReplyDelete