Showing posts with label The Patchsmith. Show all posts

Saturday, April 4, 2015

Easter Greetings

Easter Greetings and Fun Sewing-

Two fun little projects to share with you:


Easter Mug Rug  pattern  by The Patchsmith 


I made this sweet  little Easter Egg and Bunny mug rug for my mother.  With The Patchsmith's pattern and  superb directions, it took me less than 2 hours to make up this little holiday gift!  My mom just loved getting the little surprise in the mail.  Next year, I would like the make the Easter Cross Mug Rug


Next,  while I was all in the " Bunny Making Mode" .... and I made up these:


Basket full of Bunnies


Bunny Softy Pattern-          by Melanie  at The Crafty Cupboard  (free pattern!)

Size:      6 " tall   (after reducing the pattern to 75% of original size)

I ended up making 11 little bunnies, to give as little Easter presents, at my Aunt's house.  There will be 5 other ladies there, of all ages. I wanted to have bunnies in  a variety of fabrics, hoping that there will be a bunny that every person will like.  I made two scrappy bunnies ( for me if no one picks them!)


Can you figure out my "bunny boo-boo " ?


Yep..."some bunny" didn't put both fabrics right sides together
 before stitching them up !
He's still cute....  He's just playing it "low volume" on the back side!


I'm off to my sewing room!


Sunday, March 22, 2015

Geometric Gradation Quilt


Last month, I was a guest blogger on  Alyce 's blog, at Blossom Heart Quilts .  I had fun sharing a bunch of projects to her readers.

I introduced my finished  Geometric Gradation Quilt on that post.     I wanted to show some more pictures of my finished quilt.

Quilt:    Geometric Gradation Quilt -   "Penn State White-Out !"
        pattern by  Geta at Geta's Quilting Studio   {available here}

Size:   66 inches x 78  inches

 I was commissioned to make a Penn State University quilt for a young lady  in our church.
 I knew that Geta's pattern would be perfect to feature the PSU team fabrics, and would spotlight  the navy and white colors for Penn State.

This pattern has a lot of blocks, but don't let that intimidate you.  The  pattern is  easy to follow and so logical, with  many pictures and diagrams. Geta takes you through the process, step by step.     I love making projects designed by Geta! 


Front side-  " Penn State White-Out "    Susie's Sunroom


Front side   Geometric Gradation


She can use the back panel for decorating her walls , too


I had some nice small pieces leftover, and decided to make a pillow to accompany the quilt, for an "extra." 


I used the scraps for a  12 " x 16 " pillow      Susie's Sunroom

   I used this really neat The Patchsmith pattern,  Ticker Tape Mug Rug,  for a way to layout  my scraps.  ( I had to give and take, as my scraps were not the correct sizes.)  I like how it turned out, and so did the Penn State gal. 


Ticker Tape Mug Rug
                                             This is a great little scrap buster mug rug pattern!
And.... speaking of Pillows.....

I am so happy to share a couple of pillows that a new quilter friend, Martina, has made using my Simply Striped Accent Pillow pattern!   { here on my Craftsy}


Pillows made  by Martina,  at Stufenzumgerich blog  
photo courtesy of Martina

These pillows really brighten up her gray couch!


Martina's Simply Striped Accent Pillows-  fabric by   Malka Dubrawsky
photo courtesy of Martina
You'll want to hop over  to visit Martina on her  Stufenzumgericht  blog and see all of her gorgeous work .    I think that Stufenzumegericht (German)  means "courthouse steps" in English!


I'm off to my sewing room!


Linking up at:     Can I Get a Whoop Whoop! @ Confessions of a Fabric Addict

Monday, December 1, 2014

Santas

December's Across The Pond Sew Along Theme


See what we have been making {here}

What is the theme for December's Across The Pond Sew Along?

                                      Santas  and Christmas Trees!

Perfect December fun!  And we think you will find these projects fast and fun , and perfect for creating  future keepsakes and for your holiday giving!

I have some Santa projects  to share with you, and Amanda, will be spotlighting some Christmas Tree projects for you.

But I can't help but show you this....
Amanda, The Patchsmith, has been staying up late at night, dreaming up a new pattern....  the Quilted Tree pattern.  It is just so clever and  adorable!  Hop on over to The Patchsmith to get her new FREE pattern and see her little quilted trees decorated, Patchsmith style,  and to see more Christmas Tree projects!!

Quilted Tree  -      pattern by The Patchsmith

Quilted Tree    a new FREE pattern by Amanda, The Patchsmith   click {here}
photo courtesy of The Patchsmith 

Just sew  darn cute, aren't they ? !!


First Santa Project-     the Christmas Hat       ~  a paper pieced block pattern
 by Janeen ,  from   the digital magazine "Paper Piecing 1/4"  issue 3  click { here}


I loved this design , and from the start, wanted to try to make the white furry parts of Santa's hat with some "Minkie Dimple-like " fabric.
It worked surprisingly well with paper piecing. 
         WARNING-  do not iron this synthetic material.  I finger pressed my seams as I made the block.   And it does create bits of white fur scraps from cutting.

I started to feel "jolly" as Santa's Hat began to come together, when joining the sections!
~see my  past blog 

And this is my completed Santa's Christmas Hat:

Christmas Hat      by Susie's Sunroom

I would love to make this into a pillow... and may possibly add some ornament blocks, by Janeen , Quilt Art Designs, to the front!   


Second Santa Project:  Paper Pieced Santa Pattern    - a paper pieced ornament
by Pinwheel Wonders blog     -click {here}

Paper Pieced Santa ornament
Pattern and photo  by Pinwheel Ponders
Isn't this adorable?  I hope to make a few very soon, and will put them on my blog. 
My sister Amy , of Amy Made That! ,  made ornaments like this, many years ago before I learned to quilt. So I was delighted to find these directions and a pattern.  I will be making  some  of these little  Santas to give as gifts.

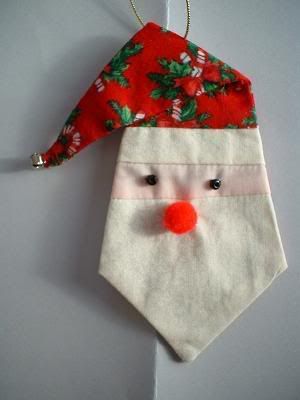
Third Santa Project:   Santa Face Pillow  and Ornament
design by Sabra at  Sew A Straight Line       click {here} for pillow in 3 sizes
                   and  Mini  Ornament  directions click {here}  

I made my pillows with different homespun fabrics, furry fleece, and jingle bells.

There are 3 sizes of pillows!!  See the little mini ornaments!


The ornaments look so cute in a basket!

Furry cuteness!


Peek A Boo !
I made one with scraps,too!

As you can see,  it is easy to make LOTS of  Santas!  I liked cutting out all of the pattern pieces first,  and then sewing them in batches.  The blanket stitch is made with my Viking Topaz, in black thread.  I stuffed them, added the jingle bell, and did the hand stitching while watching tv.

If you make any ATPSA projects, you can share them with us at our Flickr Group HERE.

Come on by and visit my blog all during December, as I make more holiday projects!

And, let me know if you find yourself   addicted to  making LOTS of anything I have shared with you today!  Hope you have fun making your Christmas projects!


I'm off to my sewing room!

 I am linked to :   Anything Goes Mondays @ Stitch by Stitch  and
                            Paper Piecing Party    @  Quilt Art Designs


Pattern provided by QAD Publishing

Saturday, November 1, 2014

November Across The Pond Project

November's Across The Pond Sew Along Project


Make fun things... sewing along with us!
You can join anytime!  Here are our projects

The season is changing, and the weather is getting colder.  Time to snuggle up with a quilt and a good book!!


And that brings me to the theme of this month's Across The Pond Sew Along project:
Bookmarks

The internet is full of lots of fun ideas for all kinds of bookmarks!   Here are just a few tutorials  to get you started making one of your own!


From The Sewing Loft Blog-       Be Mine Bookmark
Be Mine Bookmark  by Heather at The Sewing Loft Blog
I love the little patches that she made.  These don't have to be just for  Valentine's Day...


I am really excited to share this next pattern with you! 

From The Patchsmith-     Country Heart Bookmark     ... a brand new free pattern!!


Country Heart Bookmark
A free pattern, created for the Across The Pond Sew Along
  by Amanda, The Patchsmith

This book mark is just adorable!!  I love that you can use felt and fabric and ribbon... or all fabric!  And the pattern and directions are impeccably  written, in Amanda's Patchsmith style!    {click here for your free pattern}


And lastly, I 'll share my idea for a fun little bookmark, using scraps and selvedges:

Easy Print pdf file : click PDF


                                  Selvedge and Zipper Bookmark
                                                   by Susie's Sunroom


The Selvedge and Zipper Bookmark      by Susie's Sunroom

Click here to print a pdf file or save easily:    HERE


Materials:  felt 
                 Zipper parts (  these were cut off from other projects)
                 Selvedges     
My bag of selvedges

                 
Felt-   cut   2 pieces-   3 inches x 7 inches high

Zipper scrap -   pick a piece at least 4 inches long  

Selvedges-    pick out some  favorites from your bag of selvedges.  Look for pieces at least 7 inches long, to cover most of the felt
       * My bookmark used about 5 long selvedges per side.  I had to add some short pieces to cover the felt on selvedges that were too short.


1. Lay out your selvedges on top of one piece of felt.
 2.  Pin them in place, so the edges touch-to cover all felt.
3. Sew-  quilt as you go... I used a feather stitch on my machine.

 Now, lay out your selvedges on top of one piece of felt.  Arrange them so they make you smile when you look at them!

Pin them in place, so the edges touch and all felt is covered.

Now you are ready to sew them onto the felt.  You " quilt as you go" ... I used a feather stitch on my machine.  
                
I call the #27 stitch, in the second row, my "Feather Stitch"
- on my Viking Topaz 30

Lay the two felt/fabric pieces, with wrong sides together.

Trim around the edges, making sure that no felt shows.  Trim any stray threads.


Close up of the feather stitching.  You could use a zig zag stitch, as well


Insert the zipper scrap about 1/2 inch, in the bottom of the bookmark.  (Place between the front and back pieces of the felt.)  Check so that the top of the zipper shows on the side you are calling "front."  Pin the zipper piece in place.

Sew around all four sides of the bookmark.  I used my machine blanket stitch.  Reinforce the side with the zipper piece. ( I simply used reverse, and then forward again, when stitching on the zipper area.  Sew slowly over the zipper.)


The back side- the zipper sewed in between the layers;
the blanket stitch on all four sides

Trim away any stray threads and little sections of felt that may show.

Lastly, curl up under your quilt with a favorite book, using your new bookmark!


For easy printing or saving:  click HERE  for the  complete tutorial in a pdf file !


We'd love to see the bookmarks that you make!  Share them with us at our Flickr Group-
Across The Pond Sew Along Flickr Group

And you won't want to miss seeing the bookmarks at Amanda's  The Patchsmith blog   AND
Amy's   Amy Made That! blog!  They are sew creative and I love all of their work!!


I'm off to my sewing room!
I am linked up at:   Can I Get a Whoop! Whoop! @ Confessions of A Fabric Addict  and
                             Sew Cute Tuesday @ Blossom Heart Quilts  and
                              Fabric Frenzy Friday  @ Fort Worth Fabric Studio  and
                             TGIFF @ aylin-nilya blog    and
                             Sew Darn Crafty @ Sew Many Ways

Sunday, August 17, 2014

Patchique Blocks 18 and 109

Patchique Blocks 18 and 109


I actually made these Patchique Blocks awhile ago, but have been too busy to share them with you.  Progress on the blocks has been going well, and  Amanda has assured us that the end "is in sight"....  ( We aren't making every block in the book... there are 125 of them.)


Sewing these patchwork and applique' blocks
 with Amanda, The Patchsmith


Patchique' Block # 18:   Kawari kasuri taikaku ( which means Kasuri diagonal variation)

Block # 18  Kasuri diagonal variation from the book

And this is my Block #18:    


#18   Kawari kasuri taikaku     Susie's Sunroom

I enjoyed making this block.  Amanda kindly pointed out that this block is very similar to block #17  ....  with the center block showing some variation.  


Block # 17  Kasuri diagonal    Susie's Sunroom


Patchique' Block # 109:  Asa no hana  (morning flower)


#109  from the book   by Susan Briscoe


Block #109  Morning Flower     by  Susie's Sunroom
This block whipped up into shape easily, after I followed The Patchsmith's directions, using fusible applique'.   This is one of my favorite applique' blocks so far.

What do my Patchique' blocks  look like so far?


My Patchique' blocks     as of August 2014  


I'm off to my sewing room!
Linking up at:   Fabric Frenzy Friday @ Fort Worth Fabric Studio