Showing posts sorted by relevance for query anita vacation. Sort by date Show all posts

Tuesday, November 5, 2013

Poppies for Purse Palooza 2013

This weekend, I had the pleasure of sewing a tote bag for a friend .  She saw one of my tote bags when I visited her, and said, "That's the bag that I want you to make for me!"
"That bag" happened to be an Anita Vacation Tote bag, with a few extra "add-ons" that I made for myself. 
Let me tell you about it...

Pattern:  Anita Vacation Tote     PDF Pattern by eamylove  at Amy Made That!
This is a versatile tote pattern~  that can be made to look very sophisticated and used as a purse.. or used as  a carry-all on a vacation... or  a carry -on in a plane.


The Anita Vacation Tote    pdf pattern   available on Craftsy


an Anita Vacation Tote    made by  Susie last year 


Fabrics:  Poppy Love -   poppies,  black with dots, and zig zag  by Lisa Audit  for Wilmington Prints
              Quilters Linen -  rust   by Robert Kaufman
               Pellon Fusible Fleece  987FF

Dimensions:  final bag      13 inches wide   (10 inches at the bottom)
                                    13 inches high
                                     6 inches deep   
                                     Straps at 29 1/2 inches long

Original features :      magnetic snap closure
                               inner zippered pocket  8 1/2 inches wide
                               inner strip pocket (13 1/2 inches across)
                                long straps in 2 different fabrics

Extras for customizing:    made it with  2 magnetic snaps for closing
                                    added a second inner zippered pocket
                                    made 2 slip pockets on  inside  7 1/2 inches by 7 1/2 inches
                                    added outer pockets:  front 13 inches wide by 10 inches high and
                                                                  back  divided into 2 pockets    7  wide  by 10 inches high
                                    added "R"  monogram  2 inch high
                                        

The custom tote:


Anita Vacation Tote    customized


The back side    with 2 out pockets


The huge front pocket.... great for a magazine.  Monogram R


Inside view....   a zippered pocket and a slip pocket on each side


Inner pockets...  have more of the  poppy fabric to enjoy


These bags are really fun to make, and Amy has provided excellent  step by step directions in the pdf pattern.  {The pattern calls for one zippered pocket and one row of pockets on the opposite side.  So you don't have to be intimidated if this is your first zippered pocket bag that you make.} 
My friend will  be using her bag as purse, and I know she will love all of the pockets, and especially  the  inner zippered pockets for securing her wallet and phone.


Anita Vacation Tote 


I will be linking up this tote purse  in Purse Palooza 2013,  over at Sew Sweetness.  Sara organized purse pattern reviews through all of October.   The bags that are being shared at  Sew Sweetness  are really beautiful and amazing!


I'm off to my sewing room!

...and linking up at  Sew Cute Tuesday @ Blossom Heart Quilts


Sunday, July 13, 2014

Denim and Batik Tote Bags

Denim and Batik Anita Vacation Tote Bags

What you get when you combine denim fabric, brightly colored Batik fabrics, and a wonderfully versatile tote  bag pattern?    

Why,   you get a couple of brightly colored , yet practical, Anita Vacation Tote bags!!

                                                   
Anita Vacation Tote bags , using Batik fabric                   Susie's Sunroom

Here are the details:

Pattern:   Anita Vacation Tote bag -     pdf pattern    by Eamylove @ Amy Made That! 
Amy's pattern is written clearly, in tutorial style, with lots of pictures.
              ( This pattern is available at the sale price of $5 now on Craftsy !)

Fabrics used:  Dark blue bottom weight Denim
                     A Batik  , with a rainbow of colors , from my stash  

Bag Dimensions:   10" wide x 13" tall x 6" deep

Tote Bag Features:  Straps with 2 fabrics,  Zippered pocket in the lining, and  magnetic snap top closure

Before I began to sew, I made sure to pre-wash the denim and batik, to minimize  any dark colors running  and any possible shrinkage.


I chose to feature the blues and greens in this bag


I featured the yellows and oranges in this tote


See the bright linings

Wow,  these Anita Vacation Totes can hold a lot!!


I made these bags for Nancy, who is using one bag for carrying things to work ( a small purse , her lunch, and book ),  and the other bag  for her gym/workout clothes.


I am going to post my Anita Vacation Totes in Amy's flickr group "  Amy Made That! and So Did I " ,  where you can see some other  beautiful totes !  Come on and make one for yourself this summer.... you know you've been wanting to make something for yourself!


I'm off to my sewing room!

Friday, November 9, 2012

Across the Pond Sew Along Project

The Anita Vacation Tote bag .....for the Across the Pond Sew Along!!


Amanda,  of  The Patchsmith  , and Amy , of  Amy Made That!  , and myself,  are hosting this sew along group, and we'd love have YOU jump in and make the projects with us,  whenever you can!   (No pressure.... just support, encouragement and inspiration from each other!)  You can see ,and add  Yours! to, what we make on the Across the Pond Sew Along Flickr page !

If you want to learn about  the Across the Pond Sew Along , click on the Page tab under my banner heading (top of blog) or   read back on my blog to :  
http://susiessunroom.blogspot.com/2012/11/announcing-sew-along.html .


This is November's Project:

You can purchase the pattern at  Amy Made That!


I have been a  busy gal this week, and made up my mind to pick out the fabrics to use to make my Anita Vacation Tote bag!   (I am lucky to have a big stash, and sometimes,  one of the hardest parts of making a project is actually deciding on the final fabric to use! )


I decided on my Denyse Schmidt fabrics from JoAnn Fabric  (happy dance!)

The fabric, on top of this pile, with the grey , teal and cream tile print , is one Fat Quarter , out of 4 fat quarters  , that are actually all included/printed  in one panel.  Denyse Schmidt , brand  DS Quilts,  sold at JoAnn Fabrics.  I still have 3 fat quarters to create something with!

This pattern has some really nice features(that are adaptable)-

  • Creating longer handles.... that you can make with 2 different fabrics!
  • Zippered inside pocket
  • Row of pockets inside
  • Big size.... but sophisticated style
  • Magnetic snaps for good closure of bag


Amy's pattern directions are clear and precise.   I love the step by step directions, WITH the great pictures !  

As I made my bag,  I liked the fabric combination so much that I  decided to embroider  an "S" on, so I couldn't give it away!


"S"  font  Emily   found at  www. Embroitique.com

I added my " S "   with my Viking Topaz machine  

I had a few smaller pieces of the top band (for accent at the top of the bag) from the fat quarter ,  so I pieced them together to add an inch to the top of the inside pocket.   After you fold it in half,  it became about 1/4" wide, and looks a bit like binding at the top of the pocket.   I like having a pocket for my cell phone, so I  stitched a small pocket on one side, and a 2" wide pocket for pencils and pens on the opposite side.  The directions are flexible, so you can customize these pockets to what you like!
My row of pockets, with cell phone pocket, middle section pocket and pen/pencil pocket

The other pocket is a zipper pocket!   I love peeking in there and seeing my grey dotted fabric!
I also love having the magnetic snaps, that keep my bag closed tightly and easily.   


Susie's Anita Vacation Tote bag 
I'm ready for that vacation now!  Does that come with the pattern??  Just kidding, Amy!
I will use this as my  tote bag and purse  when I travel!   This  bag will make a gorgeous gift for  holiday giving!
Look over at Amanda and Amy's blogs soon,  to see their Anita Vacation tote bags!  I can't wait!
Sew ... how  are YOU making your Anita Vacation Tote bag ??    :)
I'm off to my sewing room!


*  Check out the linky to  Can I Get a Whoop Whoop Friday   at
Confessions of a Fabric Addict  !  

Wednesday, November 7, 2012

Announcing a Sew Along !

The    Across the Pond Sew Along

I am so delighted to tell you about a new group that YOU  can sew  along  with every month!   
                                 Across the Pond Sew Along  
                                     

The Across the Pond Sew Along is being  hosted by Amy of Amy Made That!, Amanda of the Patchsmith, and myself, Susie of  Susie's Sunroom  ,  friends who are separated by the Atlantic Ocean .  This sew along aims to combine laughter and friendship with a love of sewing. Every month there will be a different project to share.

At the start of this journey ,  we are a  group of friends, sisters, mother and daughter  .... Join in with us,  no matter which side of the pond you are on, for some fun and friendly support.  There may be some  giveaways along the way!

We have an Across the Pond Sew Along Flickr group , that  you can join and post your  own creations from the sew along, and see what other beautiful projects the members of the sew along group are creating!  Or just hop over to the Flickr page and see what everyone has made so far.  

  { One of my favorite things about being part of this sew along, is that I will be  getting to see the marvelous patterns designed by  Amy Made That! and The Patchsmith!  They both have their patterns available to purchase on Craftsy, and you can get the direct links from their blogs..... it is so easy and fast!  }

                                              
And now let's begin the "funnest" part of being in a sew along....making great projects!!                                                               
                   November's Sew Along Project:

                              The Anita Vacation Tote       designed by eamylove


Need to find this downloadable pdf pattern, so you can make the Anita Vacation tote, too?  That's easy:    visit  Amy Made That!  and her Etsy shop  
                 or-    visit her on Craftsy

You can see many bags Amy has made with this pattern, varying fabrics and some details, on her blog page.

                 I made this black and yellow nosegay Anita last year: 
The Anita Vacation Tote         by Susie

Inside peek ...   The pattern includes directions for a zippered pocket!
I can't wait to see  The Patchsmith 's bag!   I love seeing  how everybody puts together different fabrics and accents !  (Check out the Flickr page for Across the Pond Sew Along)

l be looking for you in our Flickr group!  Time to start making my Anita Vacation Tote for the sew along!


I'm off to my sewing room!


Friday, November 1, 2013

November Across The Pond Sew Along Project


November's Across The Pond Sew Along Project


One Year  for   Across The Pond Sew Along!!


November... the perfect time to join in and make a project  with us
in this fun and idea-filled sew along!
I can't believe that it was one year ago that we began our Across The Pond Sew Along group!   Amanda,  The Patchsmith,  and Amy, Amy Made That!, and I wanted to make fun projects monthly , and to make new friends along the way.   ( I also wanted some "creativeness" to "rub off onto me" , from being around Amy and Amanda and their friends and followers.)

Your might remember our first project, back in November 2012.  Amy chose the Anita Vacation Tote Bag~
November 2012 ATPSA Project  Anita Vacation Tote
This is my own version of the Anita Vacation tote~
My Anita Vacation Tote Bag   Susie's Sunroom

 
Since then, our group has made a lot of projects!   And our Flickr Group has grown to 59 followers , with 231 pictures!  Pictures of projects have been submitted by 26 different quilters!  I just love seeing the projects that you have put into the group to share!  Thank you so much for sewing along us.  I am inspired by your work and creativity and talent!


Now it is time to see what Amy has selected for this month's theme:   Apples!!
The  Apple theme... can mean make any kind of apple  or use  any apple fabrics...  something to do with apples.
I loved this idea, and really loved it when I started looking through all of my stash for any red and green fabrics.  Because I found some apple fabric that I had used to make a purse.

Fabrics:   Apples  -Timeless Treasures
               Red plaid -  Timeless Treasures
              Green gingham-  Cotton Blossoms  Dill Dot Plaid    Moda
               Green -  Nature's Christmas  by  Sandy Gervais for Moda Fabrics
               Cream blender-     Molly B's Studio  by Marcus Fabrics

My fabrics  ... yummy!
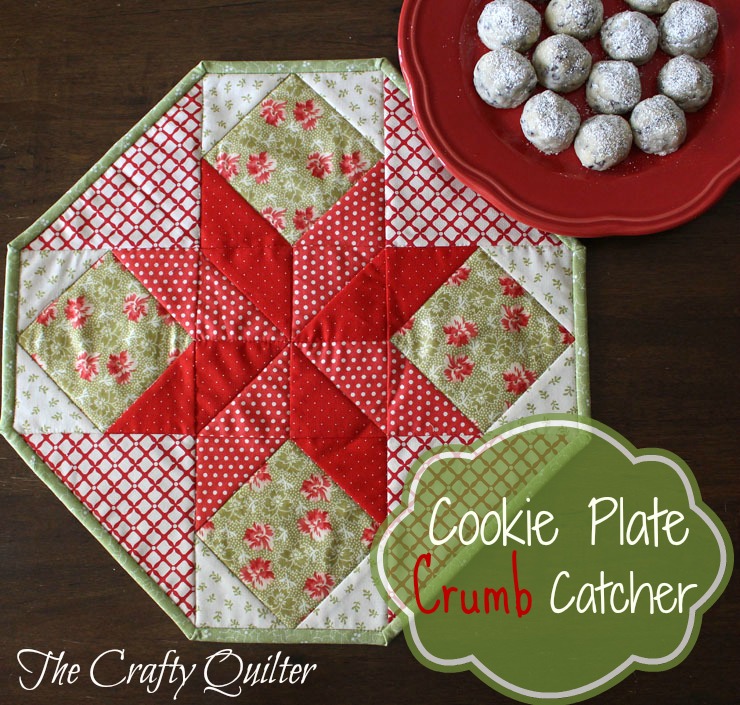
My  Project :   Cookie Plate Crumb Catcher    by Julie C , The Crafty Quilter blog

Super cute pattern  for a Cookie Plate Crumb Catcher    by The Crafty Quilter
photo courtesy of The Crafty Quilter

Julie's  blog featured a pattern for a Cookie Plate Crumb Catcher table topper, in gorgeous Christmas fabrics, in mid-October. I could just see my  apples in the squares in this pattern.   Julie gives  us a tutorial showing exactly  how to make it !  This is awesome because I had no idea how to make it on my own!

I fussy cut my squares, to feature one apple in each square.   I used Fons & Porter Fussy Cutting Templates, that had the center marked on a clear square. It was so easy to see where to cut each 5 1/2 inch square.  (I have had these templates for 2 years and never really used them before.)                ** These are 50% off at Joann.com through Sat.**
Back side  of a square in a square    

 Julie also has an awesome tutorial for making a Perfect Square in Square.  I loved using this method, as it is like paper piecing the corners onto a square.
This method left room for seam allowances at the four corners
I used the 45 degree angle on my 3 x 18 inch Omnigrid Ruler, to trim my HST squares
Laying out the pieces for the topper
Yep.... love that red plaid in the corners!

One of the square in square blocks 
I was happy with my piecing together of the top.  I  see a few places that aren't meeting perfectly. But,  I hope to improve on them when I make my next crumb catcher. This is a fun pattern to make.

Julie 's tutorial also  shows  how to make the angled binding. (Thank you, Julie!)   I machine quilted it on... but to the BACK side first.  Why did I do that???  I don't know why.  ( I marked this on my notes!)
My next crumb catcher,  I will sew the binding on to the front first, and then  most likely hand sew the binding to the back.  

The back of the crumb catcher.  You can see where I stitched in the ditch to feature the pinwheel

The Cookie Plate Crumb Catcher 

I love the green inner pinwheel

For more creative and beautiful apple project ideas, hop on over to Amy's blog,  Amy Made That!,  and Amanda's blog, The Patchsmith .  We will be putting our project pictures in the Across The Pond Sew Along Flickr group.  We'd love for you to put your apple project in there,too!  (Or any Across The Pond project you have made.)


This was such a fun project to make.  I hope to put up some more "apple" ideas on my blog in November , too.   


I'm off to my sewing room!


Linking up at Can I Get a Whoop Whoop! @ Confessions of a Fabric Addict    and
                      TGIFF @  Quilt Matters


PS
If you would like to see some more beautiful variations of The Crafty Quilter's  Cookie Plate Crumb Catcher pattern,  go on over to see Sheri's blog at Sunshine in the Attic.  She has several beautiful crumb catchers in seasonal fabrics.  
Sheri's crumb catchers:
photo by Sheri at  Sunshine in the Attic blog

photo by Sheri at Sunshine in the Attic blog