Monday, October 13, 2014

Block Talk in October

Block Talk - Patchique blocks #13 and #93


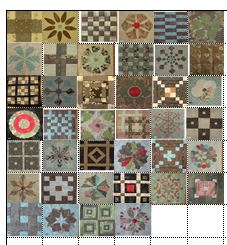
Amanda and I are getting close to finishing up the blocks for our Patchique Quilt Project... Sewing Along with The Patchsmith.   I have 2 more new  blocks to add to my pile of Japanese Taupe Quilt inspired blocks...


Making blocks from the book  Japanese Taupe Quilts
by Susan Briscoe

Block #13:  Yottsu masu  (means Four square measures):


Block #13  from the book 

This was a fun block to make.  We make four smaller blocks, and sew them together.  There are 76 pieces of fabric in this 9 1/2 inch block!

Here is my interpretation of the Four square measures # 13:


Block #13  Four square measures   by Susie's Sunroom

 Block #93:  Hosenji kiri guruma ( which means Elongated paulownia wheel):


Block #93 from the book

And this is my  block #93 -  Elongated paulownia wheel-


Block #93  Elongated paulownia wheel     by Susie's Sunroom


This block was also fun to create.   
What does my  layout look like so far?   I will be adding sashes and a block in each outer corner, too....

Patchique Quilt blocks layout   Susie's Sunroom
I measured my bed ,  and I think I'd like to have my quilt measure at  96 in x 96 in.  


Stop by to visit on Wednesday.... I'll be "Mixing it up" a bit....


I'm off to my sewing room!

Friday, October 10, 2014

A Plum Fabric Wreath for Fall


Finished Fabric Wreath

Sew Along with us!  (click here for projects)


The October theme....   Fabric Wreaths

Ideas and Inspiration.....   


The Patchsmith's fall fabric wreath.... I call this fall splendor!


The No sew fabric wreath and buttons    tutorial by SewMcCool.com

                                   
The plum shades in our fall yard

The Fabric...

A woven fabric with pinks and taupe... from my scrap box for the main fabric  


I pulled out 3 of the darker plum/cranberry fabrics from my scrap box

The  Construction Details....

        The wreath frame:
Mini 7 inch wire wreaths- purchase for One dollar each at The Dollar Tree Store (US)


I gave a haircut to  the "fake ribbon-like greens" on the wreath

   Cut the fabrics:

Cut all  fabrics into strips:   1 inch tall x 5 inches across

My wreath used this many  strips:     Main woven fabric - 38
                     (approximately)                    Accent fabric 1 -  11
                                                                 Accent fabric 2 - 11
                                                                 Accent fabric 3 - 11

    Tie on the strips:

Tie  on  (single tie/not a knot)   a main fabric,  main fabric, accent fabric 1    then,
         main fabric,  main fabric, accent fabric 2    then,
         main fabric,  main fabric, accent fabric 3     then,

  •     repeat this sequence until your wreath is  completely filled.    
You can fill in with extra strips as desired, or  make the length of the strips according to your taste.   You will learn how to twist the fabric, as you tie them  on, so that you minimize seeing the  "wrong side" of the fabric.  


About 2/3 completed


Finished wreath....pretty, but it was lacking something....
   Hot Glue Buttons on:
Buttons-  15  in various sizes and colors

My Fall Plums Fabric Wreath                


  Tips:

  • Amanda, The Patchsmith, gave the tip to use a flannel or  woven fabric... so the back side is the same as the front side!


  • I used the little gold thread loop that came with the wreath, for a hanger.  I simply inserted it as I tied on one of the upper  fabric strips.


  • This project is simply begging to be modified for different holidays!  You can cut the strips and get the supplies all ready , and then tie them on while watching tv in the evening. 


Enjoy!


This  mini  wreath  is convenient to use in groupings....

On a table
Or....     hanging on my mantle....

Hanging on my mantle

  Share your wreath if you make one... HERE   ..... in the Across The Pond Sew Along Flickr Group!


I'm off to my sewing room!
Linking up at :  Sew Cute Tuesday @ Blossom Heart Quilts

Wednesday, October 8, 2014

Fabric Wreath Fun

October's Across The Pond Project


Our Sew Along's projects and themes are here

October's evenings are crisp and cool,  and they signal  the leaves that it is time to change into their fall wardrobe ...

Amanda, The Patchsmith, has found a really beautiful project for us to make during October, to celebrate the beautiful , rich colors of fall.  She made a really gorgeous fabric wreath with fabric strips ...


Fall Fabric Wreath     made by Amanda, The Patchsmith

Aren't her  fabrics just perfect for fall?  Amanda  used a 10 inch wire wreath and 1 " x 5 " strips of fabric to make it.   (see here for how she made her wreath)

When I saw Amanda's  wreath, I immediately ran to my stash , to pull out some fabric scraps to make my own wreath.   I am stopping by  a Dollar Tree Store (in the US), to see if they carry any wire wreaths.  (A Quilter's Mission suggested this store for wreaths on Amanda's blog post comments.)


All but one of these fabrics were given to me in a scrap box !
Now, you may have noticed that  these  fabrics tend lean to the plum tones...  
I'll show you what they reminded me of...


My palette inspiration.. our maple tree  out front 

There are lots of tutorials online to help you get started on making your own fabric wreath.   I ran across this beautiful wreath...  on SewMcCool.com . 
Deanna glued little seasonal buttons onto  some of the fabrics on a foam wreath.

No sew fabric wreath   tutorial by SewMcCool.com

I'll let you know how my fabric wreath turns out!

Won't you join Amanda,  Amy, and I in making this fast and "scrap buster" project?   If you make one, or want to see what others are making, just hop on over to our Across The Pond Sew Along Flickr Group to see what folks are posting!  

I'm off to my sewing room!