
It's " Christmas in July " in the Across The Pond Sew Along
The first of July brings a new project, selected by myself, for our Across The Pond Sew Along!
 |
| See our past projects... and join in ANYTIME! There's no time limits :) |
The 'Christmas in July ' project: create a Christmas item.
~ This can mean any item with a Christmas pattern or theme,
or make something with "Christmasy Fabrics" ( Holiday colors and/or themed fabric ).
Maybe you have a kit that you have been wanting to make up "someday". Maybe you'd like to see some ideas that I have. And, my super-creative Sew Along partners always have wonderful and fun ideas... check out Amanda , at The Patchsmith, and Amy, at Amy Made That! , to see what they are making.
My Christmas project: a Christmas theme table runner
Recently I saw this cute pattern, for a row in sew along quilt.
It is designed by Clover and Violet, for a row in the Round Robin Winter Wonderland Sew Along, at Patchwork Posse. I stored it away in my brain , thinking it would look terrific as a table runner for the holidays.
It is called Merry Gift Boxes . This is a free pattern, by Clover and Violet! It is a block, made by paper piecing. It is easy to download, here, and easy to make. It would be a great project for a beginner paper piecer, too.
I selected 6 fabrics (One background, one back/binding, one for all the ribbons, and 3 for gift wrappings)
After printing my pattern once (for reference and for my folder) , I made 3 copies of the pattern itself.
I studied the directions, and made notes on the pattern this way to join the pattern pieces. (This wasn't on the pattern, and I think if you are new to paper piecing, it will help a lot.)
Sew together in this order:
B+C
BC + A (far right box)
E + D
F + G long box bottom
ED (on top) to FG (on bottom)
EDFG to ABC
In my table runner,
Each block used the same background fabric (cream and gold), and the same ribbon color (red). Then each gift box was varied between the three fabrics. I used colored pencils to color in each block, before I cut out the patterns. Planning ahead of time saves me a lot of mistakes and a headache!
Additionally, I decided to trace the bows triangle pieces onto Freezer paper, and then made a 1/4 " seam allowance around each triangle. I cut them out. Then I labeled and ironed them onto my red fabric, and cut them out a little bigger than the seam allowance. It went quickly to put them in place to be sewn, with minimal waste. (....always testing them to make sure they would cover the area properly.)
After making the 3 three blocks, I joined them together to form a row that was 48 inches wide by 8 inches high.
To make the table runner wider, I added strips to each side, to make a 3 inch border on all sides:
2 - 48 " wide x 3 1/2 " tall
2 - 14 " wide x 3 1/2 " tall (non directional)
I wanted to make the binding simple, so I used my black backing fabric as binding, by adding one inch to every side.
Backing and binding piece: 54 " wide x 16 " tall
I learned this easy technique from a great tutorial by Colleen, at the Pretty Prudent blog.
She names this technique the Cheater Quilt Bind Off. I think it is so nice for small pieces, because it adds less bulk and I can make it look much neater. I stitch it by machine.
I didn't choose to use any batting this time in my table runner. I wanted it to lay flat. Finally, I did some minimal outline- quilting around the boxes.
My finished Merry Gift Boxes Table Runner~

Fabrics used: Moda Majestic Yule by Sentimental Studios
Holiday Flourish III Peggy Toole for Robert Kaufman
Timeless Treasures Holiday (stripes)
Luxury Blenders P & B Textiles (black with gold swirls) (backing)
Some ideas I had for Christmas projects....
If you want to buy a pdf pattern, that is 'make-able' in a day or so , has excellent directions, and projects perfect for gift giving... hop on over to The Patchsmith's blog. There are lots and lots of oh-so-cute Christmas patterns to choose from in her Craftsy shop!
I want to make one of these sweet reindeer mug rugs, too!
I think it would be sooo cute to make a little House Ornament using Christmas fabrics...
I'll show you mine when I make it.
I'd love to see what you are making for Christmas... so link it up in our Across The Pond Sew Along Flickr group! You can go over there to get some great inspiration and ideas!
I have met such talented quilters through our group!!
My Christmas project: a Christmas theme table runner
Recently I saw this cute pattern, for a row in sew along quilt.
It is designed by Clover and Violet, for a row in the Round Robin Winter Wonderland Sew Along, at Patchwork Posse. I stored it away in my brain , thinking it would look terrific as a table runner for the holidays.
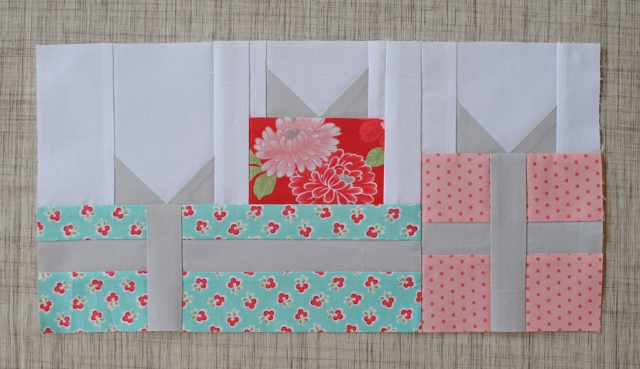 |
| Merry Gift Boxes photo by Clover and Violet |
It is called Merry Gift Boxes . This is a free pattern, by Clover and Violet! It is a block, made by paper piecing. It is easy to download, here, and easy to make. It would be a great project for a beginner paper piecer, too.
After printing my pattern once (for reference and for my folder) , I made 3 copies of the pattern itself.
I studied the directions, and made notes on the pattern this way to join the pattern pieces. (This wasn't on the pattern, and I think if you are new to paper piecing, it will help a lot.)
Sew together in this order:
B+C
BC + A (far right box)
E + D
F + G long box bottom
ED (on top) to FG (on bottom)
EDFG to ABC
 |
| How to sew the sections together to make the block |
Each block used the same background fabric (cream and gold), and the same ribbon color (red). Then each gift box was varied between the three fabrics. I used colored pencils to color in each block, before I cut out the patterns. Planning ahead of time saves me a lot of mistakes and a headache!
Additionally, I decided to trace the bows triangle pieces onto Freezer paper, and then made a 1/4 " seam allowance around each triangle. I cut them out. Then I labeled and ironed them onto my red fabric, and cut them out a little bigger than the seam allowance. It went quickly to put them in place to be sewn, with minimal waste. (....always testing them to make sure they would cover the area properly.)
After making the 3 three blocks, I joined them together to form a row that was 48 inches wide by 8 inches high.
 |
| My 3 blocks joined together, with strips added to each side |
2 - 48 " wide x 3 1/2 " tall
2 - 14 " wide x 3 1/2 " tall (non directional)
 |
| A simple 3 inch border on all four sides |
Backing and binding piece: 54 " wide x 16 " tall
I learned this easy technique from a great tutorial by Colleen, at the Pretty Prudent blog.
She names this technique the Cheater Quilt Bind Off. I think it is so nice for small pieces, because it adds less bulk and I can make it look much neater. I stitch it by machine.
 |
| The backing is placed so there is one inch extra on all four sides, to fold for the binding |
I didn't choose to use any batting this time in my table runner. I wanted it to lay flat. Finally, I did some minimal outline- quilting around the boxes.
My finished Merry Gift Boxes Table Runner~
 |
| Merry Gift Boxes Table Runner by Susie @ Susie's Sunroom |

Fabrics used: Moda Majestic Yule by Sentimental Studios
Holiday Flourish III Peggy Toole for Robert Kaufman
Timeless Treasures Holiday (stripes)
Luxury Blenders P & B Textiles (black with gold swirls) (backing)
Some ideas I had for Christmas projects....
If you want to buy a pdf pattern, that is 'make-able' in a day or so , has excellent directions, and projects perfect for gift giving... hop on over to The Patchsmith's blog. There are lots and lots of oh-so-cute Christmas patterns to choose from in her Craftsy shop!
 |
| Reindeer Mug Rug Pattern by The Patchsmith |
I want to make one of these sweet reindeer mug rugs, too!
I think it would be sooo cute to make a little House Ornament using Christmas fabrics...
 |
| June's Across The Pond Sew Along project House Ornament |
I'd love to see what you are making for Christmas... so link it up in our Across The Pond Sew Along Flickr group! You can go over there to get some great inspiration and ideas!
I have met such talented quilters through our group!!
Year after year, I swear that I'll get started making things for the Christmas holidays WAY before December.... and then it is December before I even know it! So, I thought that making a Christmas project NOW....would be just the thing to get some new items made for Christmas this year. I really enjoyed sewing with my Christmas fabrics in this project.

Come on, and join along , and get into the spirit early!
Linking up to And So We Craft Together Linky Party
 |
| I'm off to my sewing room! |


