Showing posts with label Amy Made That. Show all posts

Friday, January 29, 2016

Let It Snow !

Let It Snow!!

I had some sewing  fun when we were snowed-in last week!  
(Oh darn, it was a blizzard ALL day Saturday.... so I "had" to stay inside .... and sew!!)


What did I make?

This cute little Mr Snowman block  , designed by Lori Holt, of Bee In My Bonnet  and Instagram  @beelori1   #MrSnowmanTutorial


Mr Snowman mini quilt   by  Susie's Sunroom
Design by Lori Holt  Bee In My Bonnet


I found her Instagram tutorial at  #MrSnowmanTutorial.   Lori had a Mr Snowman SewAlong in 2014, where she showed how to make this cute snowman block,  on Instagram.  I learned her technique for making the 6 1/2 inch blocks, from making the Vintage  Farm Girl Vintage Sampler Quilt.   (here)  So these snowman made up quickly.


I  got out my shovel, and dug into some of my favorite fabric piles,  ( wink) ,  and thought that the white dots on the mint background fabric looked like snow.    The fabrics are from Vintage Summer  by Little Yellow Bicycle  , and the mint background is  by Riley Blake.  I love those little Bluebirds.


I sewed them together with some sashing, and embellished  each snowman with embroidery and buttons.

This picture is  a bit off in color,  but I wanted to show my Mr Snowman mini up against the snow on our deck!!


Mr Snowman against the snow on our deck  


This Mr Snowman mini quilt then  led to my next project....

A " Be My Valentine Heart " Mr Snowman pincushion   !
  (Bet you can't say  that three times fast!!)


Be My Valentine Heart Mrs Snowman  pincushion     by Susie's Sunroom


First, I made a "Mrs " Snowman block, wearing her  Valentine's Day' s scarf.
Next,   I made a scrappy heart- shaped front for my pincushion...  using the new
Be My Valentine Heart Mug Rug pattern by Eamylove at Amy Made That!   


Amy's pattern makes an elegant scrappy flat mug rug...


Amy made this gorgeous Be My Valentine Heart Mug Rug  for me as a gift!  Lucky me!!


I gathered together my red , pink and hearts fabric scraps, and some pink ric rac, to make  the patchwork square.   (I enlarged the heart template to make it just a bit bigger, so I could include more of my snowman block for the pincushion back side.)


I followed Amy's excellent tutorial style directions,  and at the end, I  filled my mug rug with polyfil stuffing until it looked  plump and cute.  

The end result is a Valentine's Day season pincushion, with two fun sides!!

Side A:   The Be My Valentine Heart


And Side B:   The Mrs Snowman 


If you live where there is not any snow....   then I hope you have enjoyed a bit of snow happiness here. (Without getting sore muscles and numb fingers and toes from shoveling!)



I'm off to my sewing room!

Linking up at:     Can I Get A Whoop Whoop! @ Confessions of a Fabric Addict   and
                          Fabric Frenzy Friday  @  Fort Worth Fabric Studio   and
                         Let's Bee Social  @  Sew Fresh Fabrics        and
                     Sew Cute Tuesday @  Blossom Heart Quilts   and
                         Fabric Tuesday @ Quilt Story  and
                         TGIFF  @ Busy Hands Quilts

Friday, November 9, 2012

Across the Pond Sew Along Project

The Anita Vacation Tote bag .....for the Across the Pond Sew Along!!


Amanda,  of  The Patchsmith  , and Amy , of  Amy Made That!  , and myself,  are hosting this sew along group, and we'd love have YOU jump in and make the projects with us,  whenever you can!   (No pressure.... just support, encouragement and inspiration from each other!)  You can see ,and add  Yours! to, what we make on the Across the Pond Sew Along Flickr page !

If you want to learn about  the Across the Pond Sew Along , click on the Page tab under my banner heading (top of blog) or   read back on my blog to :  
http://susiessunroom.blogspot.com/2012/11/announcing-sew-along.html .


This is November's Project:

You can purchase the pattern at  Amy Made That!


I have been a  busy gal this week, and made up my mind to pick out the fabrics to use to make my Anita Vacation Tote bag!   (I am lucky to have a big stash, and sometimes,  one of the hardest parts of making a project is actually deciding on the final fabric to use! )


I decided on my Denyse Schmidt fabrics from JoAnn Fabric  (happy dance!)

The fabric, on top of this pile, with the grey , teal and cream tile print , is one Fat Quarter , out of 4 fat quarters  , that are actually all included/printed  in one panel.  Denyse Schmidt , brand  DS Quilts,  sold at JoAnn Fabrics.  I still have 3 fat quarters to create something with!

This pattern has some really nice features(that are adaptable)-

  • Creating longer handles.... that you can make with 2 different fabrics!
  • Zippered inside pocket
  • Row of pockets inside
  • Big size.... but sophisticated style
  • Magnetic snaps for good closure of bag


Amy's pattern directions are clear and precise.   I love the step by step directions, WITH the great pictures !  

As I made my bag,  I liked the fabric combination so much that I  decided to embroider  an "S" on, so I couldn't give it away!


"S"  font  Emily   found at  www. Embroitique.com

I added my " S "   with my Viking Topaz machine  

I had a few smaller pieces of the top band (for accent at the top of the bag) from the fat quarter ,  so I pieced them together to add an inch to the top of the inside pocket.   After you fold it in half,  it became about 1/4" wide, and looks a bit like binding at the top of the pocket.   I like having a pocket for my cell phone, so I  stitched a small pocket on one side, and a 2" wide pocket for pencils and pens on the opposite side.  The directions are flexible, so you can customize these pockets to what you like!
My row of pockets, with cell phone pocket, middle section pocket and pen/pencil pocket

The other pocket is a zipper pocket!   I love peeking in there and seeing my grey dotted fabric!
I also love having the magnetic snaps, that keep my bag closed tightly and easily.   


Susie's Anita Vacation Tote bag 
I'm ready for that vacation now!  Does that come with the pattern??  Just kidding, Amy!
I will use this as my  tote bag and purse  when I travel!   This  bag will make a gorgeous gift for  holiday giving!
Look over at Amanda and Amy's blogs soon,  to see their Anita Vacation tote bags!  I can't wait!
Sew ... how  are YOU making your Anita Vacation Tote bag ??    :)
I'm off to my sewing room!


*  Check out the linky to  Can I Get a Whoop Whoop Friday   at
Confessions of a Fabric Addict  !  

Wednesday, November 7, 2012

Announcing a Sew Along !

The    Across the Pond Sew Along

I am so delighted to tell you about a new group that YOU  can sew  along  with every month!   
                                 Across the Pond Sew Along  
                                     

The Across the Pond Sew Along is being  hosted by Amy of Amy Made That!, Amanda of the Patchsmith, and myself, Susie of  Susie's Sunroom  ,  friends who are separated by the Atlantic Ocean .  This sew along aims to combine laughter and friendship with a love of sewing. Every month there will be a different project to share.

At the start of this journey ,  we are a  group of friends, sisters, mother and daughter  .... Join in with us,  no matter which side of the pond you are on, for some fun and friendly support.  There may be some  giveaways along the way!

We have an Across the Pond Sew Along Flickr group , that  you can join and post your  own creations from the sew along, and see what other beautiful projects the members of the sew along group are creating!  Or just hop over to the Flickr page and see what everyone has made so far.  

  { One of my favorite things about being part of this sew along, is that I will be  getting to see the marvelous patterns designed by  Amy Made That! and The Patchsmith!  They both have their patterns available to purchase on Craftsy, and you can get the direct links from their blogs..... it is so easy and fast!  }

                                              
And now let's begin the "funnest" part of being in a sew along....making great projects!!                                                               
                   November's Sew Along Project:

                              The Anita Vacation Tote       designed by eamylove


Need to find this downloadable pdf pattern, so you can make the Anita Vacation tote, too?  That's easy:    visit  Amy Made That!  and her Etsy shop  
                 or-    visit her on Craftsy

You can see many bags Amy has made with this pattern, varying fabrics and some details, on her blog page.

                 I made this black and yellow nosegay Anita last year: 
The Anita Vacation Tote         by Susie

Inside peek ...   The pattern includes directions for a zippered pocket!
I can't wait to see  The Patchsmith 's bag!   I love seeing  how everybody puts together different fabrics and accents !  (Check out the Flickr page for Across the Pond Sew Along)

l be looking for you in our Flickr group!  Time to start making my Anita Vacation Tote for the sew along!


I'm off to my sewing room!


Tuesday, November 6, 2012

A Clay Jar and Mug Rug

A Mug Rug inspired by... faith

Oh, dear little mug rug , how do I love thee?  Let me count the ways....

You are tiny... and anything "mini" is  cute!

You are a little "practice run" of a pattern or a  block or  an idea....
(translation:  if there is a mistake, I don't  lose a lot of time or fabric!!)

I am much more likely to try something different and new when making you, a  little rug  (Translation:  I am 'chicken' on big things! but will give it a try if it is small!)

Since you are little, you can be finished quickly....  that's closer to instant gratification (compared to a big quilt)


I always have a  source of PATTERNS  (easy, cute , seasonal, versatile) at my fingertips , for when I am in the mood to make a new mug rug.  Enablers Designers , The Patchsmith  and   Amy Made That! , create beautiful and fun designs for mug rugs...(Check out their  blogs to see their patterns  for sale on Craftsy!)  

One of the Patchsmith's Mug Rug Patterns-  Blackbirds
(This  Blackbirds pattern is on my "To Make" list!)

Amy Made That! 's  Tumbler Mug Rug
(I made something based on this Tumbler pattern, but can't show it until Christmas!)

You are so fun to give away!

Sometimes, my own ideas come together to  make a mug rug.  ( I also like that there are no set rules of what a mug rug HAS to be.)

One Sunday,  after hearing an inspiring sermon by Pastor Jim, at our church,   an idea for a mug rug just popped into my head.  The sermon was based on the scripture 2 Corinthians 4: 7-12 ;  treasures in clay jars.    

I found a machine embroidery pattern for the Presbyterian Church Symbol.  And also stitched the words , with my Viking Topaz.
I found a  paper pieced JAR  pattern online from Shape Moth!  Perfect!
I found a paper pieced pattern for making jars , at  Shape Moth.com, and then I ordered fabric that looked like terra cotta , for clay.

Clay Jars   Mug Rug  for Pastor Jim
Thank you for inspiring us every week, Pastor Jim!
When you see this little mini quilt , remember you are appreciated!

I'm off to my sewing room!


See more about this Sew Along in my next blog post!


Tuesday, October 9, 2012

Lucky me

No time for boredom here

Ho , hum... I'm just sitting here at the computer, minding my own business...reading blogs and my emails....
Being a good girl and not succumbing to my urges to make more mug rugs  incessantly through the day and night....

And then I read my sister's  post on her  Amy Made That! blog. 
It's all downhill from here, folks.  Now I have to add another  sewing addiction to my list....    Cathedral Window Pincushions.  :(       (but inside I am feeling totally  :) )


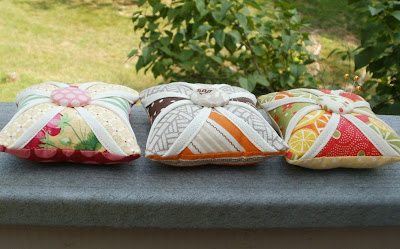
Amy showed us her  line-up of  the many different little pincushions that she made using the Cathedral Window pattern. To me, they look like  delectable  little tarts sitting all in a row ,   after coming out of the oven....


Amy Made That! 's  3 little tarts  pincushions all lined up
Amy Made That! 's  Blueberry Tart    Turquoise Pincushion-  irresistible! 
So, I went online to find some tutorials and learn  more about cathedral windows.  I ended up studying  these two great tutorials:

  • Cathedral Window Pincushion  at Moda Bake Shop.com, by Kim  of My Go-Go Life blogspot.com.   I used this tutorial mainly.
  • Cathedral Window Pincushion Tutorial by Susanne Klemm  on Riley Blake Designs/Cutting Corners College.com   I didn't actually use this technique this time, of   folding the white block twice .... but it helped me understand the way to make the windows. I will try this method (of turning it inside out after you fold and sew the center) next time I make a pincushion.   (See ,my addiction is flaring up again--  I left something for me to try the  NEXT time I sew this pincushion... planning  with anticipation for the next one, before I finish the current project !)
After reading these tutorials, I gathered my materials and was ready to go.  I found  some cute strawberry fabric, and some reds and greens to coordinate with it.
This is a picture  of my first Cathedral Window Pincushion.   I made some mistakes ,but I learned from them.  

My first Cathedral Window pincushion ...   It has some "issues"
  • I learned that the fabric that "peeks through" the windows has to cover the whole white square, so that it reaches out to the far corners.   (I had to add some fabric patches to make the berry fabric reach to the corners.)
  •  I learned that the white fabric has to be folded over AT LEAST an inch (like a hem)  or  the whole square double -folded  so that only hemmed fabric  shows  -with the curved parts   (Deep , wide hems allow you to make the curve smooth and uniform in shape with the other curves.)
  •  I learned that stuffing with scraps of Pellon FF987 is not soft enough for filling a pincushion.  I need  to use fiberfill, and  I need to fill it until it is plump!
Luckily, when I need  expert advice, I can just call or email my sewing expert, Amy!  She gives me lots of good tips and an endless source of projects to try!

Yesterday, I made my second pincushion.  I took my time and re-read the instructions.   Luckily, they made more sense this time. I made sure that  I folded  the white fabric exactly, making wide hems,  and actually made the pincushion  a little smaller.  I liked Amy's smaller size .  I used scraps of my Moda Dogwood Trail for the fabric.  I love the pink and greens in this line.

My second pincushion!  This has much more pizzazz!

I made sure it was plump!
Even Whiskers made sure that it was plump enough!

I was finally pleased with my first  little Cathedral Windows project.  
You can bet it won't be my last!


I'm off to my sewing room!


Tuesday, September 18, 2012

Halloween Mug Rugs

Halloween Mug Rugs

I decided to make some Halloween themed mug rugs this week.  
I think that I have an bad case of "Mug Rug Fever" ...
Some mild symptoms first appeared  after I made my   Scottie Dog Mug Rug . I got  cranky mildly irritated when I didn't have time to immediately make a second one upon completion.  
Then,  my fever started climbing higher and higher as I read the recent posts  from Amanda,  The Patchsmith.

Spoiler alert:    Skip over  this next  area in red  if you don't want to know what Amanda's latest mug rug pattern is before you see her blog post! (or  if your immune system can't handle being exposed to the Mug Rug Bug  right now!)
*********************************************************************************************************                                  It is so darn cute and irresistible... 
                                                Elephants!!  
She has this new pattern and lots of other cute patterns available on Craftsy.              And, you won't want to  miss seeing  her blog post on Thursday, Oct. 4, as she will have an original design featured that day in  the Glorious Autumn Block Party by Quilting Gallery.com.   You will be seeing more of her patterns on Susie's Sunroom in the future.   She is so darling and talented, and makes me laugh. ;)


Spoiler End ****************************************************************************
Whiskers is pointing to her favorite one.... but she prefers bigger rugs to lay on!
 OK,  you can read now.  
I made myself finish the piles of clothes that needed to be ironed.  Then I treated myself to  some fun- by making  some mug rugs out of Halloween colors.  (Does anyone else make herself do the "chores" first ,  and then reward herself  with "sewing time" ?!)  (uh-oh...)

Here are my two new mug rugs:

Ghost  and Candy Corn Mug Rugs
 The ghost was fun to make, because I used scraps . I decided to make it scrappy for the background and the back side.
I sewed 1 1/2 inch strips together.  Then I cut the rectangle out  on on angle.
The Back:  even patchier and scrappier,  by sewing pieces together to form a larger rectangle.  

 I applied the ghost-shaped applique to the front, using Heat-n-Bond lite, iron-on adhesive.Then I  used embroidery thread to create  his eyes and mouth. (by hand).  Machine quilting was next-

I made "ripples" around the shape of the ghost, to machine quilt it

I blanket stitched the applique shape, using my Viking Topaz.  I love this stitch!
Now for the binding:   I have started  using this great machine binding method for small projects, like mug rugs , wall hangings and pot holders.  My clever sister, Amy, of Amy Made That! has put  her method together into  a free pdf file download (free pdf.)   (Treat yourself and go look at her blog!  I just love her style and fabric choices.)

Reality... I did not photoshop-out my imperfect binding.  It is  a little  wavy in  areas...  (And my photos seem to magnify the waves.) ....and a bit wonky at both of the right- hand corners.  But I can live with the way it looks .  Neat and clean. And it doesn't take much time to execute this method  on the sewing machine.  
Reality... Amy makes them near perfection! [ I have a lot of catchin' up to do to get even close to her level!!]
My Wonky Ghost Mug Rug

This is my Candy Corn Mug Rug:
 
Candy Corn mug rug  
 I just pieced some fabric leftovers for the back.
Back side.   No problems with this binding. I did this one BEFORE the Ghost... go figure!
Well, time to stop sewing and go shopping for some fall-flavored coffee! So I can use my rugs.
Let me know if any of you are running a Mug Rug Fever!    It is contagious!  :) sorry  not really

I'm off to my sewing room!