Wednesday, September 25, 2013

And Sew On BoM ... for September

The Sewing Sanctuary Block
                                        

Quiet Play  And Sew On Block of the month 9

September  brings in the cooler weather in the evening, and some beautiful blue skies during the days!  I call that perfect weather for sewing!   
 It also brings us to the ninth and last block in Quiet Play's  And Sew On Bom !  I will truly miss working on these blocks designed by Kristy.  (go on over to see all of her paper pieced patterns... they are fun and amazing! )

September's block is called  The Sewing Sanctuary.  This is the pattern:


The sewing sancutary  pattern   Still available for free until the end of September


This block was a challenge to come up with "just the right" fabrics, for all of the fun little details that you could place into this pattern 
(It did end up taking longer for me to choose these fabrics than the previous blocks.  But for a fun reason!)
I wanted to pick fabrics that I had used in many of the earlier blocks... for continuity in the 9 blocks. I chose a light blue color for the  wall so that it would not be too busy for the cute little  feature details.
                                          
The Sewing Sanctuary                    Susie's Sunroom


Details:      
 The window view-


A winter scene  looking out of my window
Pictures on the wall-
                sewing notions  (in black and white , to carry those colors/fabrics through), in their little yellow polka dot frames

My chair-    Wish I had a yellow one , but in my real sewing room  I use some  antique chairs from my great-grandmother's restaurant... a connection to  fond childhood memories.


I love this yellow chair!  
The waste bucket-    another fun yellow touch.  There's no such thing as  too many  yellow touches in my  sewing room!
I wanted to use some  yellow gingham again.


Here are my nine blocks in the And Sew On BoM         
What fun it has been making these!  Next, I will be figuring out how to put them all together in a mini quilt wall hanging .... for my sunroom!


I'm off to my sewing room!

You can see all of the beautiful and creative  sewing sanctuaries made by other quilters at Quiet Play  blog!

Monday, September 23, 2013

Pin It Blog Hop Giveaway Winner


The Winner of the Pin It Blog Hop Giveaway!


Thank you to everybody who stopped by my blog during the Pin It Pincushion Blog Hop!
Wasn't that blog hop a lot of fun!

I asked Mr. Random Number Generator to pick a number between 1 and 118,
and when he had a minute,        and he chose the  number 87 this time!
                                                              

Comment 87 is:   GrannyTo8Boys !

Oh my goodness-Berry Crazy indeed. So cute but makes me hungry. I am so going to make a tea bag pincushion as tea is my drink of choice-always. Thanks for the giveaway.

 Congratulations GrannyTo8Boys !!  I sent you an email, and will send you the prize when I get the address from you!

GrannyTo8Boys '  prize:       A  Charm Pack  of  Julilee  by Bunny Hill   Moda Fabric
and
A yard of    Mod Century Blender Tweed   Gray  Moda Fabric


Thanks for all of your kind comments when you came by my blog.  They mean a lot to me.
And for those who are  interested... I am hoping to make a pattern and tutorial for my tea bag pincushion soon...


I'm off to my sewing room!


Saturday, September 21, 2013

Quilts in the Pumpkin Patch Blog Hop

Quilts in the Pumpkin Patch 

Welcome to Susie's Sunroom, and Day 3 of the Blog Hop!  I was invited , by my new friend, Sheri,  to share a  fall project with you, in her Quilts in the Pumpkin Patch Blog Hop.  
Day 3  You are here at Susie's Sunroom
Thank you so much, Sheri,  from Sunshine in the Attic blog, for organizing this fun way to meet different bloggers and see new projects!  I enjoy their inspiration and talent !  Here is the lineup of bloggers:


September 19th  Sheri -- Sunshine in the Attic 
September 20th Maggie -- Maggie's Empty Nest Days
September 21st Susie -- Susie's SunRoom        you are here !
September 22nd Celine -- Espritpatch  
September 23rd  Yevette -- Evindie
September 24th Judy -- Judy's Fabric Addiction 
September 25th  Elaine -- Summercrafter 
September 26th Patricia -- Quilting Lines


I had a lot of fun finding a project to celebrate the arrival of fall.  I was constantly drawn to anything with tree leaves.  And when I saw this pattern, I knew I wanted to make it for the blog hop!

The project :  
A Wall hanging called   Tumbling Leaves   from  allpeoplequilt.com  by Gail Abeloe
This is a free pattern !     (click Here )
I like this random arrangement with the two different  sizes of leaves.
Tumbling leaves  wallhanging   from All People Quilt.com

The finished quilt is 27 in  high x 46 inches wide
The blocks are-   9 in square and 5 in square
Fabrics used:   Tic Tac created by Kim Schaefer  Andover Fabrics in 5 fall colors
                      Fall  leaves  fabric  David Textiles
                      Cream tonal  , with smallflowers,  for background
                      Blender brown ,  scraps   for stems


Fabrics selected  for my Tumbling Leaves
       Fabric amounts needed:                          
 5/8 yard cream print ( background)
3/4 yard total assorted  (blocks)
1/8 yard mottled brown (stems)-  scraps will do
1/4 yard brown print (inner border)
1 yard leaves print (outer border)
1-1/2 yards backing fabric and binding
33x51" batting  I used Pellon  FF987
 What worked for me ( from a newbie quilter):  use SCANT quarter inch seams for piecing  , and  for the  seams to put the blocks together.  I had to use the scant quarter inch to ' preserve' my point tips when joining blocks together.  My measurements then turned out to be very close to the pattern.  Make a test block and measure it,  to see what works for you :)   I read that many factors influence our seam allowances... thread type, fabric weave, the presser foot we use....
Sewing a scant quarter inch seam, using my 1/4 inch foot on my Viking
The leaf blocks were made by piecing squares and half  square triangles together.
I marked the diagonals on the cream squares, to make the half square triangles

Then I sewed on each side of the line, with a SCANT quarter inch seam.  I kept on  sewing, to make a chain of blocks.
I needed to sew every seam with a SCANT 1/4 "  seam to ' keep' my points

I used the blanket stitch on my Viking to applique the little strips onto a triangle,  to make the stem pieces
Next, I laid out all of the  squares,  to see what each leaf would look like.  I switched around colors to make them random , and ' pretty to my eye.'


                                                        Leaf Block layout:

Looking at the large leaf blocks....and arranging the colors.  I put the final selections onto a mini  project board to move to my sewing machine easily. 
Left side is unsewn  /   Right side is sewn together


The next step was to join all of the large and small leaf blocks together. (Note: I still used a scant quarter inch seam, so I didn't lose the leaf points in the seams. )


Then it was time to add the borders:

Inner: 1 1/4 inch wide strips  I chose the dark green/brown TicTac fabric. I love this color! 
Outer:  4 inch wide strips     I used my leaves fabric.  I had this fabric in my stash, and can't believe how well the Tic Tac Andover fabrics matched that leaf fabric!
                                               

                           Attaching the outer border...  the leaves fabric


Before I cut the backing, I had to decide what color and kind of binding I would use.  Because I decided to use this small quilt as a table runner by this time, I chose to use the "backing as binding" method to bind it.  I learned this technique from a tutorial by Rae, of Made-by-Rae.com, featured as a guest at Pretty Prudent.com.  It makes a clean and crisp border, with minimal bulk, that I can machine sew.  Simply add one inch to each side to the backing. This extra inch on each side (after quilting) is used to fold- over to become the binding on the front.


I chose to make the backing from the gold Tic Tac fabric.  I  also had scraps left from the other fabrics , and decided to piece them together to form a strip in the center of the gold fabric, to make it wider than 42 inches.... I needed it to be 50 inches wide


I needed final measurement of backing to be 
 31 inches tall x 50 inches wide before quilting

  I sewed pieces together of:  21 1/2 in  plus 8 inches plus 21 1/2 inches  ...  all 31 inches tall
** Note:  the above picture shows a quilted back. It was not quilted until all pieced together to be the back piece of 31 in tall x  50 in  wide


This created the backing, with enough fabric to add one inch to every side, that will become the binding.

The next step- add the batting between the front and back.  I used Pellon FF987, a fusible fleece, for the batting.  I can quilt as little or as much as I like with this fleece.  

Quilting- I put my walking foot on the machine.   I decided to quilt around the outside of each leaf shape, and in the ditch around the dark brown inner border. Then,  I wanted to add a "movement" feel to the quilt, so I decided to make some "wisps of wind" in some of  the negative space spots.

A wisp of wind

I trimmed the backing to be one inch bigger than the front, on all four sides
The backing  is pressed and double- folded over to become the binding on the front  


Next step, folding down the raw edge , after the corner is is folded

Machine stitching the binding with my walking foot
And now it is done!  My fall dishes look pretty with this runner.
My Tumbling Leaves  table runner    by Susie's Sunroom
Tumbling Leaves Table Runner  front side
Pieced Back of the Tumbling Leaves Table Runner
The swirls remind me of little gusts of wind that stir up the leaves


The Tumbing Leaves Table Runner... Welcome Fall !

                                                                                       
Thanks for stopping by  today .  I hope to see you tomorrow, Sept. 22nd,  over at Celine's blog... Espiritpatch.  I can't wait to see everybody's projects!


I'm off to my sewing room!
...and  the Pumpkin Patch this week!!
Linking up at: TGIFF  @ MIssyMacCreations   and
Can I Get a Whoop Whoop @ Confessions of a Fabric Addict and
Sew Darn Crafty @ Sew Many Ways

Thursday, September 19, 2013

Quilts in the Pumpkin Patch Blog Hop has begun

Day One of Quilts in the Pumpkin Patch has started!

Day 1  Sheri @  Sunshine in the Attic

Fall has arrived a few days early... at Sunshine in the Attic blog!  Sheri has kicked off her week of blogs with projects that celebrate fall and sewing !  You'll want to check out the new project every day.  And check in at Sunshine in the Attic, as Sheri will be having some giveaways!

Sheri's Project   Day 1   Quilts in  a Pumpkin Patch wallhanging
Here is the schedule for the rest of the hop!  The links will become active on their day.
September 19th:  Sheri - Sunshine in the Attic
September 20th: Maggie - Maggie's Empty Nest
September 21st:  Susie - Susie's Sunroom     that's me on Saturday!
September 22nd:  Celine - Espritpatch
September 23rd:  Yevette - Evindie
September 24th:  Judy - Judy's Fabric Addiction
September 25th:  Elaine - Summercrafter
September 26th:  Patricia - Quilting Lines

I am  looking forward to getting great new ideas for projects during this week!  I already have my first one.... I want to make Sheri's project soon!


I'm off to my sewing room!

Tuesday, September 17, 2013

Pin It Blog Hop + a Giveaway

A Berry Happy Blog Hop and Giveaway


Hello! Welcome to Susie's Sunroom  on this last day of the PIN IT  blog hop!


This blog hop has been so much fun!  The pin cushions have been amazing and delightful.
Thank you ,  Madame Samm , of  Sew We Quilt!  for creating the blog hop!  
And  thank you, Kristen, of Meadowbrook , for being our cheerleader, and  keeping us organized and in touch.  You have both made this such a fun experience for me to be in!
(I think that I will be  experiencing "pincushion withdrawal"  tomorrow!)


Make yourself a cup of tea.... and enjoy today's bloggers and their pin cushions!
This is my special blend...
Here is today's lineup...  you'll want to visit everyone to see the pincushions  they have created!

Did you notice that Amy, my sister, is also on today's hop?  She is  Amy Made That!.... by eamylove...  I hope you 've already been over to visit her blog to see her gorgeous pincushions.


Welcome to Susie's Sunroom    on the Pin It! Blog Hop


I found this pattern and loved that it used lots of small squares.  The pattern is  called  Patchwork Pincushion  from  allpeoplequilt.com.  (And it is free.  Click HERE)

The original pattern has the word  "pins"  on it,  but I knew immediately that  I wanted to make it say "Pin it!" for this  blog hop!   I used my favorite scraps of Fig Tree & Co. , Moda fabrics, for this nice-sized pincushion.  ( 5 " tall x 10 " wide).  It is stuffed with both poly-fill and crushed walnut shells kitty litter.  I substituted some  lace for the  ric rac in the pattern, too.  

Pin it!  Front and back


 Now I'd like to share with you the next little pincushion that I made for the blog hop .

Strawberry Shortcake pin cushion     by Susie's Sunroom
               Pincushion Pattern:   Strawberry Shortcake  by  Fig Tree Threads,
                                 It is available for purchase  at  Fig Tree & Company.com  

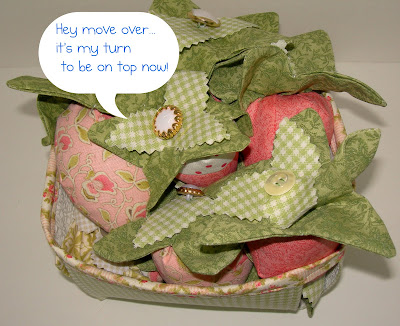
I've had my eye on this pattern for quite awhile now, and was so happy to finally make this cute little strawberry with it's jaunty, leafy cap. I have a lot of Moda Fig Tree & Company fabrics/scraps in my stash, from the lines of Mill House Inn,  Buttercup, Breakfast at Tiffany's, and Dots, that will be perfect to make a strawberry ... or two....

It is fun to add buttons on top of the leaves

Once I got started,  I just couldn't stop!


This yummy color is from Breakfast At Tiffany's
I even made some of them scrappy...

"A Scrappy strawberry is a Happy Strawberry !"

 The more I made,  the more fun I had putting them in little dishes  for "their head shots"


Smile for the camera!


Slide over for the little guy!

These guys don't mind being a little squished together!


Before I knew it, berries were overflowing everywhere.... (well, technically, I did know it...) 

Luckily , just in the nick of time, Anna, at  Noodlehead,  posted this precious  Berry Basket Tutorial !  I saw it and KNEW it was just the thing for all of my little strawberry pincushions!  It is Anna's fabric version of a little vintage pint berry basket.  It is so fun and easy to make using Anna's directions in the tutorial.  (I have made one for my mother and sister already.)


Fabric berry basket    tutorial by Anna  of Noodlehead.com


Between you and me, I think that Fig Tree & Company is mostly to blame for my little  "problem", because they include a big  and  a small size for the strawberry pattern.  And then  I couldn't help but shrink the small one down to  80% to get the tiny size!


And I couldn't believe this, .....  just after I finished making  these strawberries, my sister, Amy, gave me the cutest little white porcelain berry basket!  The berries  I could hardly wait to use this sweet little basket in a million pictures picture.


Strawberries sitting pretty in a porcelain berry basket

Now it is time for details  about my giveaway~

Giveaway Prize:

A  Charm Pack  of  Julilee  by Bunny Hill   Moda Fabric
and
A yard of    Mod Century Blender Tweed   Gray  Moda Fabric


Date:   Tuesday  September 17, 2013 - Sunday  September 22, 2013  10:00 pm EST

How to enter:   

Simply leave one comment !
If you need an idea....you can tell me  what your favorite things are to sew.

Please make sure I can get your email address  , so that if Mr. Random Generator picks your number, I can email you to get your mailing address!  (I will have to redraw a number if I can't reach you.)


Good Luck  &  thanks for stopping by!  


Can you tell that I love making pincushions?  
I'm off to my sewing room!

Linking up to And Sew We Craft Together  @  And Sew We Craft