Wednesday, June 19, 2013

Making a tote for my tablet

June continues to be a very busy month for me.  But, I did manage to 'squeeze- in'  time to finish a block and to make a tote for my little tablet computer.

at And Sew We Craft


 June's block was featured by Tonya,  at The Crafty Mummy.   It is the spool block.

Tonya's Spool Block
Her fabric is really perfect for featuring in a nice sized block!   
I got out my fabric for this sew along, and made my own spool block. It was very easy!
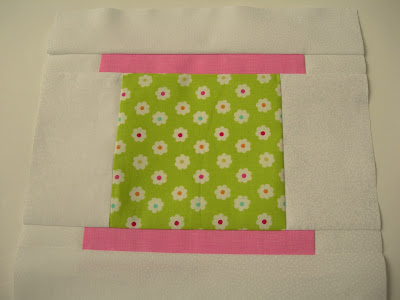
Susie's  Spool Block  
This fabric has most of the colors of my fabrics in it  
I added the Quilters Linen  Pink  (Robert Kaufman) to bring in pink to the palette
Susie's   June block
The next project was both fun and functional...  a tote for my little Asus Tablet.  
I had the perfect pattern, and I thought this would be a good time to try it out.
It is the Two Zip Hipster   ,  by  Erin Erickson of   Dog Under My Desk.  I bought this digital pattern online, and got it immediately.   Erin has excellent directions and lots of pictures to explain the steps.
Two Zip Hipster pattern
After measuring my Asus tablet, I decided to add 2 inches to the total  length of my hipster pattern. On both outside pieces  and the  lining pieces.

I wanted to make sure this tote would be well-padded, and protect my tablet when I carry it around.
For extra padding: I used Pellon FF987 (fusible fleece) on the outer main  fabrics, and on the lining.  Then, I  added a double layer of  regular batting for the back outer piece,  by laying it first on the back piece, and cut  it to be  about 1/4 inch smaller on all 4 sides. I placed the FF987 piece on top of the batting (full pattern size ) , and fused it on to the back piece.   In essence, when I ironed the fusible fleece on, it 'sealed' the batting in on all sides.  (Note: I did tack a few small stitches into the batting to keep it in place, at strategic spots, after the fleece was ironed on.  Nothing elaborate.  )

My fabrics:  

Premier Prints Amore Twill Sherbet


Quilters Linen  stone   by Robert Kaufman  This is cotton that looks like linen.... LOVE IT

Ta Dot     berry    Michael Miller
I actually used all of this from my stash....I had the Premier Prints Amore fabric  for a long time.... waiting for the right project.  The main inside lining was pink blender fabric.  I used the berry Ta Dot for the inside of the outer pockets, for some pops of color when I open up a  pocket.  It matches the Amore red and pink colors of  the stamps.
Here is my Two Zip Hipster!!

It holds a lot of "extras" that I use with my tablet
                               .
Pops of 'berry' in the pockets
My tablet , and dock, slide in through the zippered top
The extra padding is just right .  And, I love the long , and adjustable ,strap !
I want to make another Two Zip Hipster , to use for everyday.  I like having all of the front pockets (they are easy to access ) , and the  zippers to keep things closed.  I think I will add another slip pocket inside, for lots of places to put pens and kleenex...
I am ready to travel now!
Hope you are having  great summer!

Hooking up at : 

Sew Darn Crafty @ Sew Many Ways    and

Sew Cute Tuesday @ Better off thread
I'm off to my sewing room!


Friday, June 14, 2013

Better Late Than Pepper

Only a week or so late.....

I have had a busy June so far. And, the  projects that I found time to work on  have been lots of fun and personally rewarding . 

Last night, I was able to finish  work on the first Zakka 2.0 project.  The first Zakka  sew along looked like  so much fun, that  I wanted to join in on projects that I have time to do.

Lindsey,  at LR Stitched, and Deb ,  at A Quilter's Table,  are the weekly hosts.  Every week a new project is introduced, from the book, and we get to see everyone's version of the project on a Zakka 2.0 Flickr page. 
By the way,   Ayumi, the author of the book, explains that 'zakka' refers to objects that improve your home, life, or appearance.  (The book is available at BN.com and Amazon.com.)


The Zakka 2.0  Book Sew Along


Week One:  Bell Pepper Coaster

Since I began this project late, I got to read some excellent suggestions and gain  insights from other bloggers!
My two "go- to first gals", Amy  of  Amy Made That!  and Amanda of The Patchsmith  showed their peppers on their blogs.

Amanda's Bell Pepper Coasters


Amy's Bell Pepper Coasters

I decided  to use the freezer paper for the patterns, as Amy suggested.  Then I gathered up all of my red, green, orange and yellow fabrics that I thought I could pair up together .  I even had some scraps of a novelty pepper fabric, with a black background.  I made the stems from brown fabric ( 1 1/2 inch wide folded so no raw edges, sewing the folded sides together to become about 3/8 wide.)

I made my orange pepper first.  I must admit I was distracted that night, and doing too many things at one time.  I got the freezer paper part right,  but totally ' missed'  the concept that I should sew the shapes first, before cutting them out and turning them inside out.  As a result, my orange pepper was not as sharp around the edges as I would like.  But it was a great learning tool.  And I used scraps of the black pepper fabric for the back of the orange pepper.
I made it hard to turn 'right side out' by not understanding the directions the first time

 Several days later, I made the other 3 peppers.  This time, I knew what was going to happen, and had so much fun making them.  They turned out much neater, happily!


I used freezer paper for the templates


I used freezer paper for the templates


I used scraps of Pellon FF 987 for the batting on the front piece

All of my little peppers in a row


The backs of the peppers.  See the pepper fabic (black background)

Close up of the backs

Happily  , I had improved while making the peppers!

My pile of peppers
Which one do you like best, Whiskers?

I liked this project, because after I figured out how to make the peppers, they did not take long to make.  And there is a lot of flexibility to make them with ANY kind of fabric!  Hop on over to the Flickr page to see what they are making!

Yay!  I am officially in the Zakka 2.0 Book Sew Along now!  

"I'm a pepper.... you're a pepper, and if you drink "zakka" pepper, YOU can be a "zakka" pepper, too! "   *  Dr Pepper ad reference link 

(Sorry folks for that horrible pun!  It kept going around in my head while I made my bell peppers.)


I'm off to my sewing room!


Monday, June 3, 2013

English Garden

My own little English Garden....


Where has the time flown ?... It is the beginning of June now, and time to introduce the latest project in our  Across The Pond Sew Along !

Amanda has come up with a super fun little project for June...  

                                   ~  the  house ornament from Retro Mama.  

 Kim  (Retro Mama )  has a tutorial and a free pattern on her blog, titled "Home for the Holidays


Photo from Kim at RetroMama blog


These are 2 little stuffed pillow houses, made by Amanda.....
Amanda's own   little Home for the Holidays cottages ...The Patchsmith
You must go on over to Amanda's blog ,  The Patchsmith , to get an absolutely  adorable idea for a Tooth Fairy Pillow based on  this pattern!!  This is a beautiful keepsake that is easy to make!

And not to be outdone by Amanda, Amy,  of Amy Made That! blog,  has made her own creation of the little house, into a sweet  summer cottage!  ( She loves visiting the NJ shore....)
Amy's own little summer cottage    Amy Made That!

I printed out the pattern and got the website tutorial up on my computer.....

Note:  when I printed my pattern,  it came out very small , and I thought to myself...' this is going to be a stinker to turn inside out and stuff!  And I am not good at sewing super- tiny things...'
I printed it again, making sure I did not have "fit to page" or "scale"  checked... and  I did not.  It came out the smaller size again.

When  I looked closer at the pattern, I noticed that Kim  has some sizes marked  (see  the chimney and roof pieces ) .  I love scale markings,  so that we get it printed out the right size.

Fortunately, when I have a sewing question,   I am lucky that I can call up my ' Mentor and Expert Quilter'  .... Amy  (my sister!)  She checked her measurements and looked at her magazine pattern.    It was indeed the larger size pattern.

I am "double -lucky" to also  have Amanda, 'across the pond', to consult  with on pattern corrections and tips, because she loves to' forge ahead' and complete a new project , and let me know what she finds!!

I discovered after talking to both  Amy and Amanda,   that if I used  the google chrome browser, it was printing  out too small for me .{  I just enlarged my pattern to 150% on my scanner, and it was correct.}
Amanda uses Internet Explorer, so I tried  printing  out the pattern using that browser, and it printed out the correct size!!   ( I don't know if it was a glitch I was having or not...??)

So Yay!  after getting the pattern size resolved and cut out!!

  I decided I did not want to work with linen this time.  I just used cotton fabrics.
I dug out some fabric (literally, I was  digging out of a laundry basket of stash!) to find some favorite fabrics that I made a mug rug with....


My House and Home mug rug   designed by The Patchsmith 

Fabrics:    varous  
Vintage Summer    Little Yellow Bicycle  by Blend   
                              Lizzy House    Andover Fabrics
                              Joy   Kate Spain  Modafabrics

I came up with my own little English Garden cottage version....


Susie's Sunroom  little English Garden cottage      pattern design by Kim  RetroMama

 I put a little bit of scrap pellon fusible FF987  into the chimney before attaching it to the roof, to stuff it lightly.
I made a little strap for hanging my cottage over a door handle.  (I like this green color!)

I got the little silk flowers from JoAnn Fabrics
I love flowers!!


The back side     { see anything?! }


LOVE these little ladybug buttons    from JoAnn Fabric !


Hanging on my door handle

I am going to definitely make more of these.... they would be perfect little pincushions.  And I love seeing it hang on my handle of the door to my powder room!

Before I leave,  I wanted to share a few of June flowers with you....
I had the wrong name for this flower ( for 12 years) ...  a White Peachleaf Bellflower


Geranium blossom in my planter


Makes me smile to look at it  :)
If you want to see other little homes and cottages, hop on over to the Across The Pond Sew Along Flickr group to see what has been made !   You will be inspired!

  Take time to smell some flowers!


I'm off to my sewing room!

I am linking up at: