Thursday, January 31, 2013

February Across The Pond Sew Along Project


Across the Pond Sew Along  project for February

It's the beginning of a new month... and that means a new project
 for {our fun and low-keyed} 


 has launched the project plans for this month, today on her blog.

February Project:      Create a project including a Heart

Amy,  Amanda, The Patchsmith, and I will be sharing our own project ideas that have the theme : heart .   Now, that sounds  like fun for February! 

One day last week, while  looking around online for inspiration and ideas, I was drawn to a blog called The Crafty Quilter  by Julie Cefalu.  I saw her  beautiful UFO project she had finished, called,  Welcome Winter,  by Holly Hill Quilts  .    
  And  I noticed that she had four snow globes appliqued on the quilt.
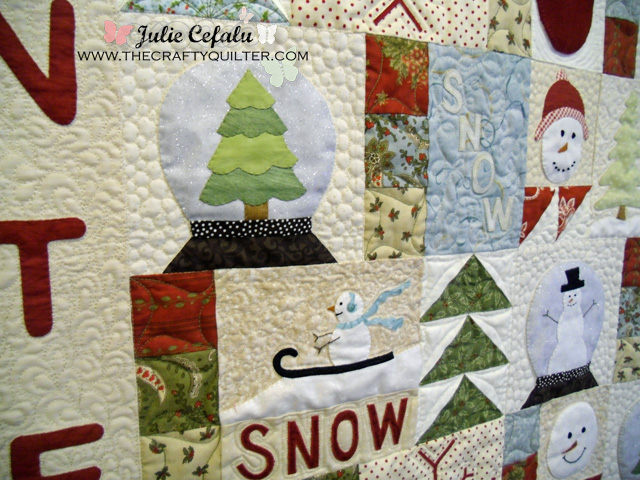


Welcome Winter quilt  made by Julie Cefalu @  The Crafty Quilter.com


I immediately starting "seeing in my mind" (Ah.... that is why you might hear me muttering away to myself at times!) a Valentine's Day snow globe, with a scrappy heart inside the globe...that I could make into a mug rug.  I sometimes "put things together" without a pattern . This time,  I wanted to create a few templates , so that  I could share with you how I created my own Heart Snow Globe Mug Rug for our sew along!

Heart Snow Globe Mug Rug  by Susie's Sunroom

If you would like to make this mug rug,  I have some basic templates 
for you to download , in this pdf  file:

The mug rug :
  • is 8 inches x 8 inches finished
  • used  applique  technique for the snow globe  ( I used Heat-n-Bond  iron-on adhesive)
  • I used scraps for the heart;  strips sewn  onto paper foundation
  • I pieced 1 1/2 inch scrap squares, sewing  8 of them together vertically
  • main background fabric is 7 in wide x 8 in tall
  • backing fabric is 10 in x 10 in
  • I machine blanket stitched the heart and snow globe
  •  Pellon Fusible Fleece  FF987  is the batting,  8 " x 8 "  
  • I used the backing as my  binding ( A great tutorial for this method is on the blog Made by Rae)
  • I  used my walking foot and  machine stitched my binding,  , with corners mitered

I began by picking out some Valentine fabric scraps for making the scrappy heart...
This was done by sewing strips onto a piece of paper, making sure to cover the heart (sew  like paper piecing with right sides together, and then  folding the right side over and ironing it.


The tweezers are my pointer!
This is the back of the paper;  I cut out the heart shape

I cut out the pieces of the snow globe, with the iron on adhesive pinned to the template and fabric.  The order of assembling the snow globe pieces*:
  1. Place the base of the globe on top of the background fabric 
  2. Place the circle snow globe above  the base, overlapping a bit
  3. Place the heart inside the globe, with the bottom touching the base
  4. Place the band on top of the base, covering the bottom of the globe ball
* see the diagram on page two of the pdf file 

Then, I sewed the (8) - 1 1/2 inch squares together, to make a vertical row.  this strip is then attached it to the main fabric piece.
The  snow globe pieces are put together and ironed on.  The backing is an extra inch all the way around, to turn down to become the binding later.


Close up of the base of  the snow globe.  Blanket stitched


My  Heart Snow Globe Mug Rug is completed and ready to be used during February
                                             
I will be posting my mug rug  in the Across The Pond  Sew Along Flickr group .
  
What  heart project will you be making this month ?   You can post YOUR heart project there, too!

If you get stuck, I will be showing a few more fun things during February.  Amy  will also be showing her project  andmore fun  ideas . Amanda is sharing a free pattern for her Valentine Coasters at The Patchsmith!
Join in with us... even if you haven't been able to do earlier!  Show us what you are making!  
And let me know if you make your own Heart Snow Globe Mug Rug.  I'd love to see it!

I'm off to my sewing room!


I am linked up to   Can I Get a Whoop Whoop @Confessions of a Fabric Addict

Tuesday, January 29, 2013

Triple Zip-Along


The Triple Zip-Along project


"What has Susie been up to lately ?" some of you may be asking yourselves....
Well, I have been Triple Zipping It!

Debbie,  from A Quilter's Table,  is hosting a sew along,  featuring her tutorial for a pouch with not one, not two, but THREE zippers!  How cute is that?!


Debbie's   Triple Zip Pouch  from A Quilter's Table
The first time I saw her pouch,  I knew that I would be making it eventually!  I can't resist 3 zippers and bright colors!!


My fabrics are from Free Spirt-  Valori Wells    berries, bird, nest
I picked out some cute fabrics, which I had been saving for awhile.  I love the taupe and pinks together.  Then I looked in my zipper basket for the right colors, to make the pinks pop !  I get my zippers from the etsy shop ZipIt! They are economically priced, and I  get 
a variety pack, of 14 inch zippers.  You can always shorten a zipper...
And, I loved this pink fabric so much, that I cut out a heart shape, to applique on the front.


This is the  largest section lining side out, after all of the sections and zippers are put together
I sewed  the sides of each pocket independently, before sewing up the sides of the other pouch fabric


This large pocket  has an opening , for pulling the finished outer bag through this hole


You can see the 2 smaller pockets . I kept them out of the way when I sewed the sides  of the pouch together.
I used  HeatnBond Lite iron-on adhesive, then machine blanket stitched around the outer edge


Here are the THREE zippers!!


My Triple Zip Pouch


I decided to use it for my special buttons , thimbles and embroidery threads


Hop on over to the Triple Zip-Along Flickr group to see everyone's pouches and get inpired!  It's not too late to make one !

And look for the  February  Across The Pond Sew Along   project on Friday!  Amy from eamylove@Amy Made That! blog is launching this month's project.


I'm off to my sewing room!


I am linked to  Sew Cute Tuesday  @ Better Off Thread

Tuesday, January 22, 2013

Blue and White Teapots

Blue and White Elegant Teapot Table Toppers

This past weekend, if you looked around in my house, you would've almost certainly found me at my cutting table, ironing board or sewing machine.  I was hunkered in, determined to make 2 more table toppers, like the one I blogged about on Jan. 8. 
 (Some of you may have lost a bet if you'd have wagered on me that I was making more bird pincushions all weekend!  I did consider doing that, though!)


Elegant Teapot -paper pieced design by Kristy @ Quiet Play blog;   Fabric in Millhouse Inn by Moda. Posted on Jan. 8  blog
The two table toppers were commissioned by my friend, Samantha,  of At Home with Mrs. H.  Go on over to her blog and see what bags she has designed (they are beautiful! ) , and what she has been up to!    You can see the bags that I made using her patterns  at  Aug. 24   and   Dec. 9  in my posts.
 She asked for the colors of blue and white.

I had some blue fabrics  in my stash, that I thought she would like.  Timeless Treasures French Court.
After a  flurry of cutting ,sewing, seam ripping, and machine quilting ,  I came out of the marathon weekend with both teapot table toppers done!


Blue and white  Elegant Teapot Table Toppers
Teapot Two


Teapot One
The two toppers  only differed by  using different fabrics in the pinwheels ,in the corners.  
The toile , that is in the pinwheels on front, was used for the backing.


The back is the toile fabric
Well,   I am resting from making teapots for a little.   But it won't be long.    I have an order already for another.... for my daughter!  She said,  "  I'd like one of those, too!  I drink a lot of tea, Mom!"
I am getting myself a nice cup of holiday tea  and a quilt to  snuggle up in during this cold spell!  Stay warm!!


                                                Sharing at:
  
I'm off to my sewing room!