Saturday, October 6, 2012

Repairing a bag

Help for a torn bag

Months ago,  I decided to make a  big duffle bag for my dear friend's daughter.  She is a huge Philadelphia Flyers fan, and her mom suggested a bag with the Flyers fabric.
It is so much easier to make something  when you know what a person likes for colors and theme!  Right?
Except in this case, I couldn't find  ANY Flyers fabrics anywhere.  I looked for a long time.

Then one day I shopped  in our local Walmart.   I passed the men's sport's apparel department, and   a pair of orange and black men's jammies  jumped out at me   appeared!  'Screeeeech  !!!! '  went the cart's  wheels as I applied my breaks !

The idea hit me right there- Buy the Flyer jammie pants, cut them up CAREFULLY, and fussy cut pieces for use in  the duffle bag!!!      
I used a pattern  by  Fig Tree & Co.  called My Paris Traveler's Bag.
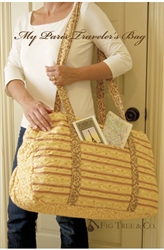

This pattern makes a big duffle bag, with a zipper top.

The jersey fabric in the pajama bottoms was easier to manage and cut than I had imagined it would be.  I cut 4 long strips for the inside of the handles.  I figured I'd use black for the outside.  I used rectangles of  the Flyers fabric for two outside pockets, where there was a lot of space for  the design to show through.  I got bright orange fabric at Joann Fabric, and used that for the gusset.  Lastly,  I used white for the inside lining. 

My friend's daughter really liked her Flyers Traveler's Bag .  She has been using it a lot.
However, currently,   it has one little problem.  One of their little dogs managed to OPEN the zipper and cause some minor damage!  
The bag had  one handle pulling off of the side, and the pocket was loosened.  The zipper was able to be pulled all the way to one end, and come apart. :(    There was some worn-out fabric at that end of the zipper.  (I think the little poochie pulled and tugged and scratched at that end for awhile.  He was trying to get her retainer, in a bag, in it's case, INSIDE the Flyers bag!  He has a good nose!!  )  Luckily, there were no tears in it!


Sewing a patch over the worn area at the end of the zipper
 I reinforced the handle and re-attached the pocket, and added the patch at the end of the zipper.
Luckily,  it fit underneath my machine with no problems.


I added this orange patch, to cover the worn area, and to stop the zipper from going off of the track
The repaired Flyers Paris Traveler's Bag

I am so happy that the repairs went smoothly , and the bag is ready to be used again!

It made me happy to see a bag that I made was being used ....and that the person liked what I made for her!   This is a big reason that I love to sew.    (YOU, too... right?!)

I'm off to my sewing room!


Tuesday, October 2, 2012

A Fun Project


House and Home M. R.

Well,  since I have made  a million quite a few of them now, I  think you picked up on  my short-hand for "Mug Rug" !

I realized that yesterday was October 1st already, and the Handcrafted Holiday Sew & Stitch  Sew Along and contestat Sew Much 2 Luv , was officially beginning. Yay!

Amanda ( of The Patchsmith) first noticed this  Sew Along, and  asked my sister Amy ( of   AmyMadeThat! blog) and myself if we wanted to participate with her in this group. I jumped in. Anything that these two ladies do is awesome and FUN! ( I go along for the ride and learn so much!! )

I love the simplicity of this sew along....   sew or cross stitch or crochet a gift a week.  Put your picture in the Flickr group, and you get a chance to win a prize!  You can use the button to the right of this blog, to go to Sew Much 2 Luv for more details.   YOU can join in anytime, too! 

The first thing  to do was to pick out a project.  I was looking at my Flickr page, and saw that clever  pattern-maker Amanda (The Patchsmith)  had posted another new pattern!   And, to my delight, it was another cute mug rug!  By now,  I was sweating, feeling my heart beat faster, and  well in the throes of a mug rug fever attack  !

I downloaded that pattern  before you could say, "Bob's Your Uncle!" (See the end of this post for more about my Uncle Bob.) ( Ahhh...instant gratification. )   Luckily, I  had a good selection of fabrics in my stash - Little Yellow Bicycle for Blend Fabrics , called Vintage Summer.  It has cherrys, greens, reds, dark pinks...that gave a feel of " cottage " to the pattern.


I used Press-N-Seal as  a template for the hand embroidery. You just sew on top of it.

You can see the Press-N-Seal better in this picture
 I  saw several tutorials online that mentioned using Glad Press-N-Seal as a template for hand embroidery.  I used a fine tip marker, and traced the pattern for the heart-shaped smoke, that comes out  of the little porch chimney.  And then I traced the word "home" .   The PNS wrap stays in place to sew.  I had to be careful  while tearing the Press-N-Seal off, though.  I saw that someone suggested using tweezers, and this was the perfect tool to help get the last little pieces of plastic out from under my stitches!
  
My House and Home mug rug
Embroidery  close up

The little cottage is fun to applique.  I added a little ric rac fence like Amanda's.
Now, I can add my picture of this fun little mug rug  to the Flickr page of the sew along, and see if I get lucky next week when they pick the first winners!
If you chose to join along,  tell me and I will post your project picture on my blog as well!

Incidentally, I really do say the  phrase ,  "Before you can say , "Bob's  your uncle! "     Today I used  it so I can segue  into  a hello to  another special uncle of mine . Uncle Bob.     Uncle Bob is a  talented musician ( he sings and plays trumpet ),  and  band and choral director.  He  is always supportive  and encouraging of our embroidery and sewing projects.

Hi Uncle  Bob!   love you  xo
It's raining and cold out today.  I am grabbing my Creme Brulee flavored coffee.   Yum.
I'm off to my sewing room!  

Thursday, September 27, 2012

Li'l Punkin

A mini pumpkin mug rug for my mother

I made a cute little mug rug this week.  (No surprise here!)
My mother is here for a visit this week. I always like to show her what I have been working on, and explain who people are that I have been telling her about on the phone.  We were looking  at patterns made by Amanda,  of  The Patchsmith . (use link to go to her Craftsy site for her patterns! ) My mother  saw the mug rug pattern   with two little pumpkins on it  and loved it for the fall .   She asked me to make her a smaller size mug rug with just one pumpkin on it.
Original Mug Rug by Amanda,  The Patchsmith

I had a lot of fall fabrics in my stash and pulled them out to figure out the ones I wanted to use for Mom.  I decided to use the left (bigger ) pumpkin, and add a row of 1 1/2 inch squares (before sewing), to the right of the pumpkin.

 I guess I got distracted a bit LOT,  and I  actually thought I was finished at this stage, after finishing the binding.
My pumpkin before quilting and embroidery


I soon  realized that it needed some embellishment to turn it into a cute li'l old punkin!
After  machine quilting the grooves in the pumpkin body and some vines off of the stem , and hand stitching  some veins onto the leaf, it was done.
Quilted and stitched small mug rug
Small mug rug

Mom's mug rug is ready to go home with her!  She is happy and ready to enjoy Halloween and Thanksgiving with her daily mug of tea!

Before I close, I wanted to shout out to one of my special  blog readers... my Uncle Monty!  He builds beautiful model railroad towns, creating his own landscapes and scenery! And now,  he is one of my enablers!
Susie and Uncle Monty     love you xo


I'm off to my sewing room!